Configuring Keycloak
There are multiple methods of deploying Keycloak. Documentation on Keycloak deployment can be found on the Official Keycloak website.
With Docker installed and running on your system you can quickly spin up Keycloak by running:
docker run --name keycloak -d \
  -p 8080:8080 \
  -e KEYCLOAK_ADMIN=admin \
  -e KEYCLOAK_ADMIN_PASSWORD=admin \
  quay.io/keycloak/keycloak:22.0 start-dev
If you need to install Docker, visit the official Docker installation guide.
This command starts Keycloak on local port 8080 and creates an initial admin user with the username admin and password admin.
This setup is designated for development and testing purposes and should not be used in production settings. For production deployments, please refer to Configuring Keycloak for Production.
Overture API Key Provider
The Overture API Key provider extends Keycloak's functionality by adding custom logic that allows Keycloak to interact with Song. The following steps outline how to download and install the Overture API Key provider:
-
Download the Overture API Key Provider.
-
Move the
keycloak-apikeys.jarfile to the provider's folder within Keycloak (opt/keycloak/providers/). -
Restart the Keycloak server for the updated provider to take effect.
Previously Set Up Keycloak?If you have previously set up Score with Keycloak, you can skip ahead to the application setup section on this page.
Realm Configuration
Login to the admin console
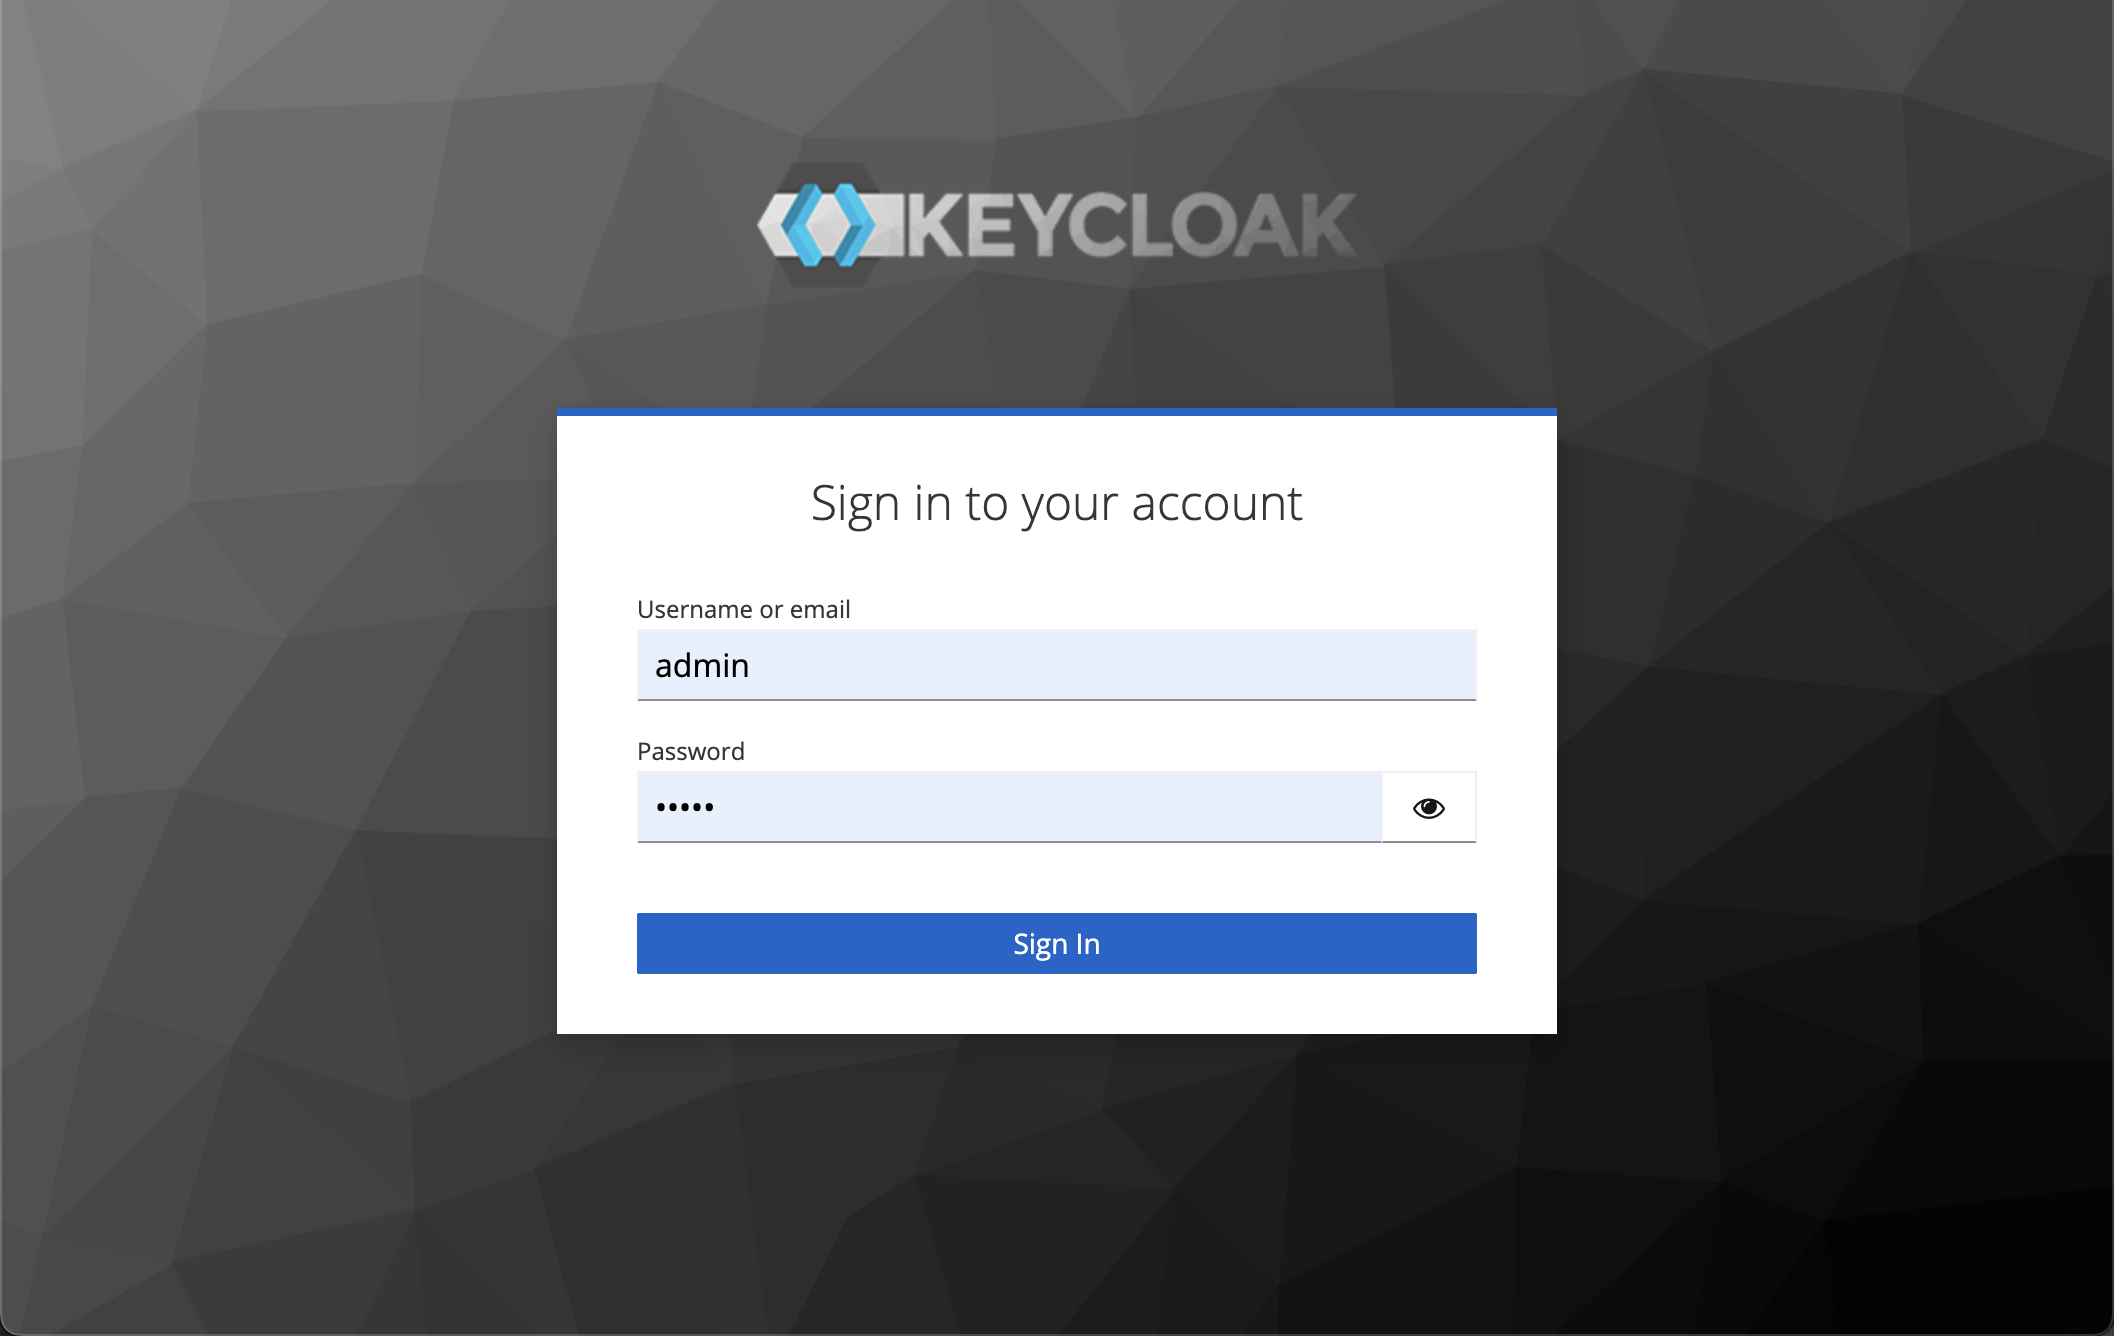
To access the admin console, navigate to <url>/admin (e.g., localhost:8080/admin) and log in with the credentials made during your Keycloak deployment.
Create a realm
Keycloak supports the creation of realms for managing isolated groups of applications and users. The default realm is named "master," and is intended solely for Keycloak management.
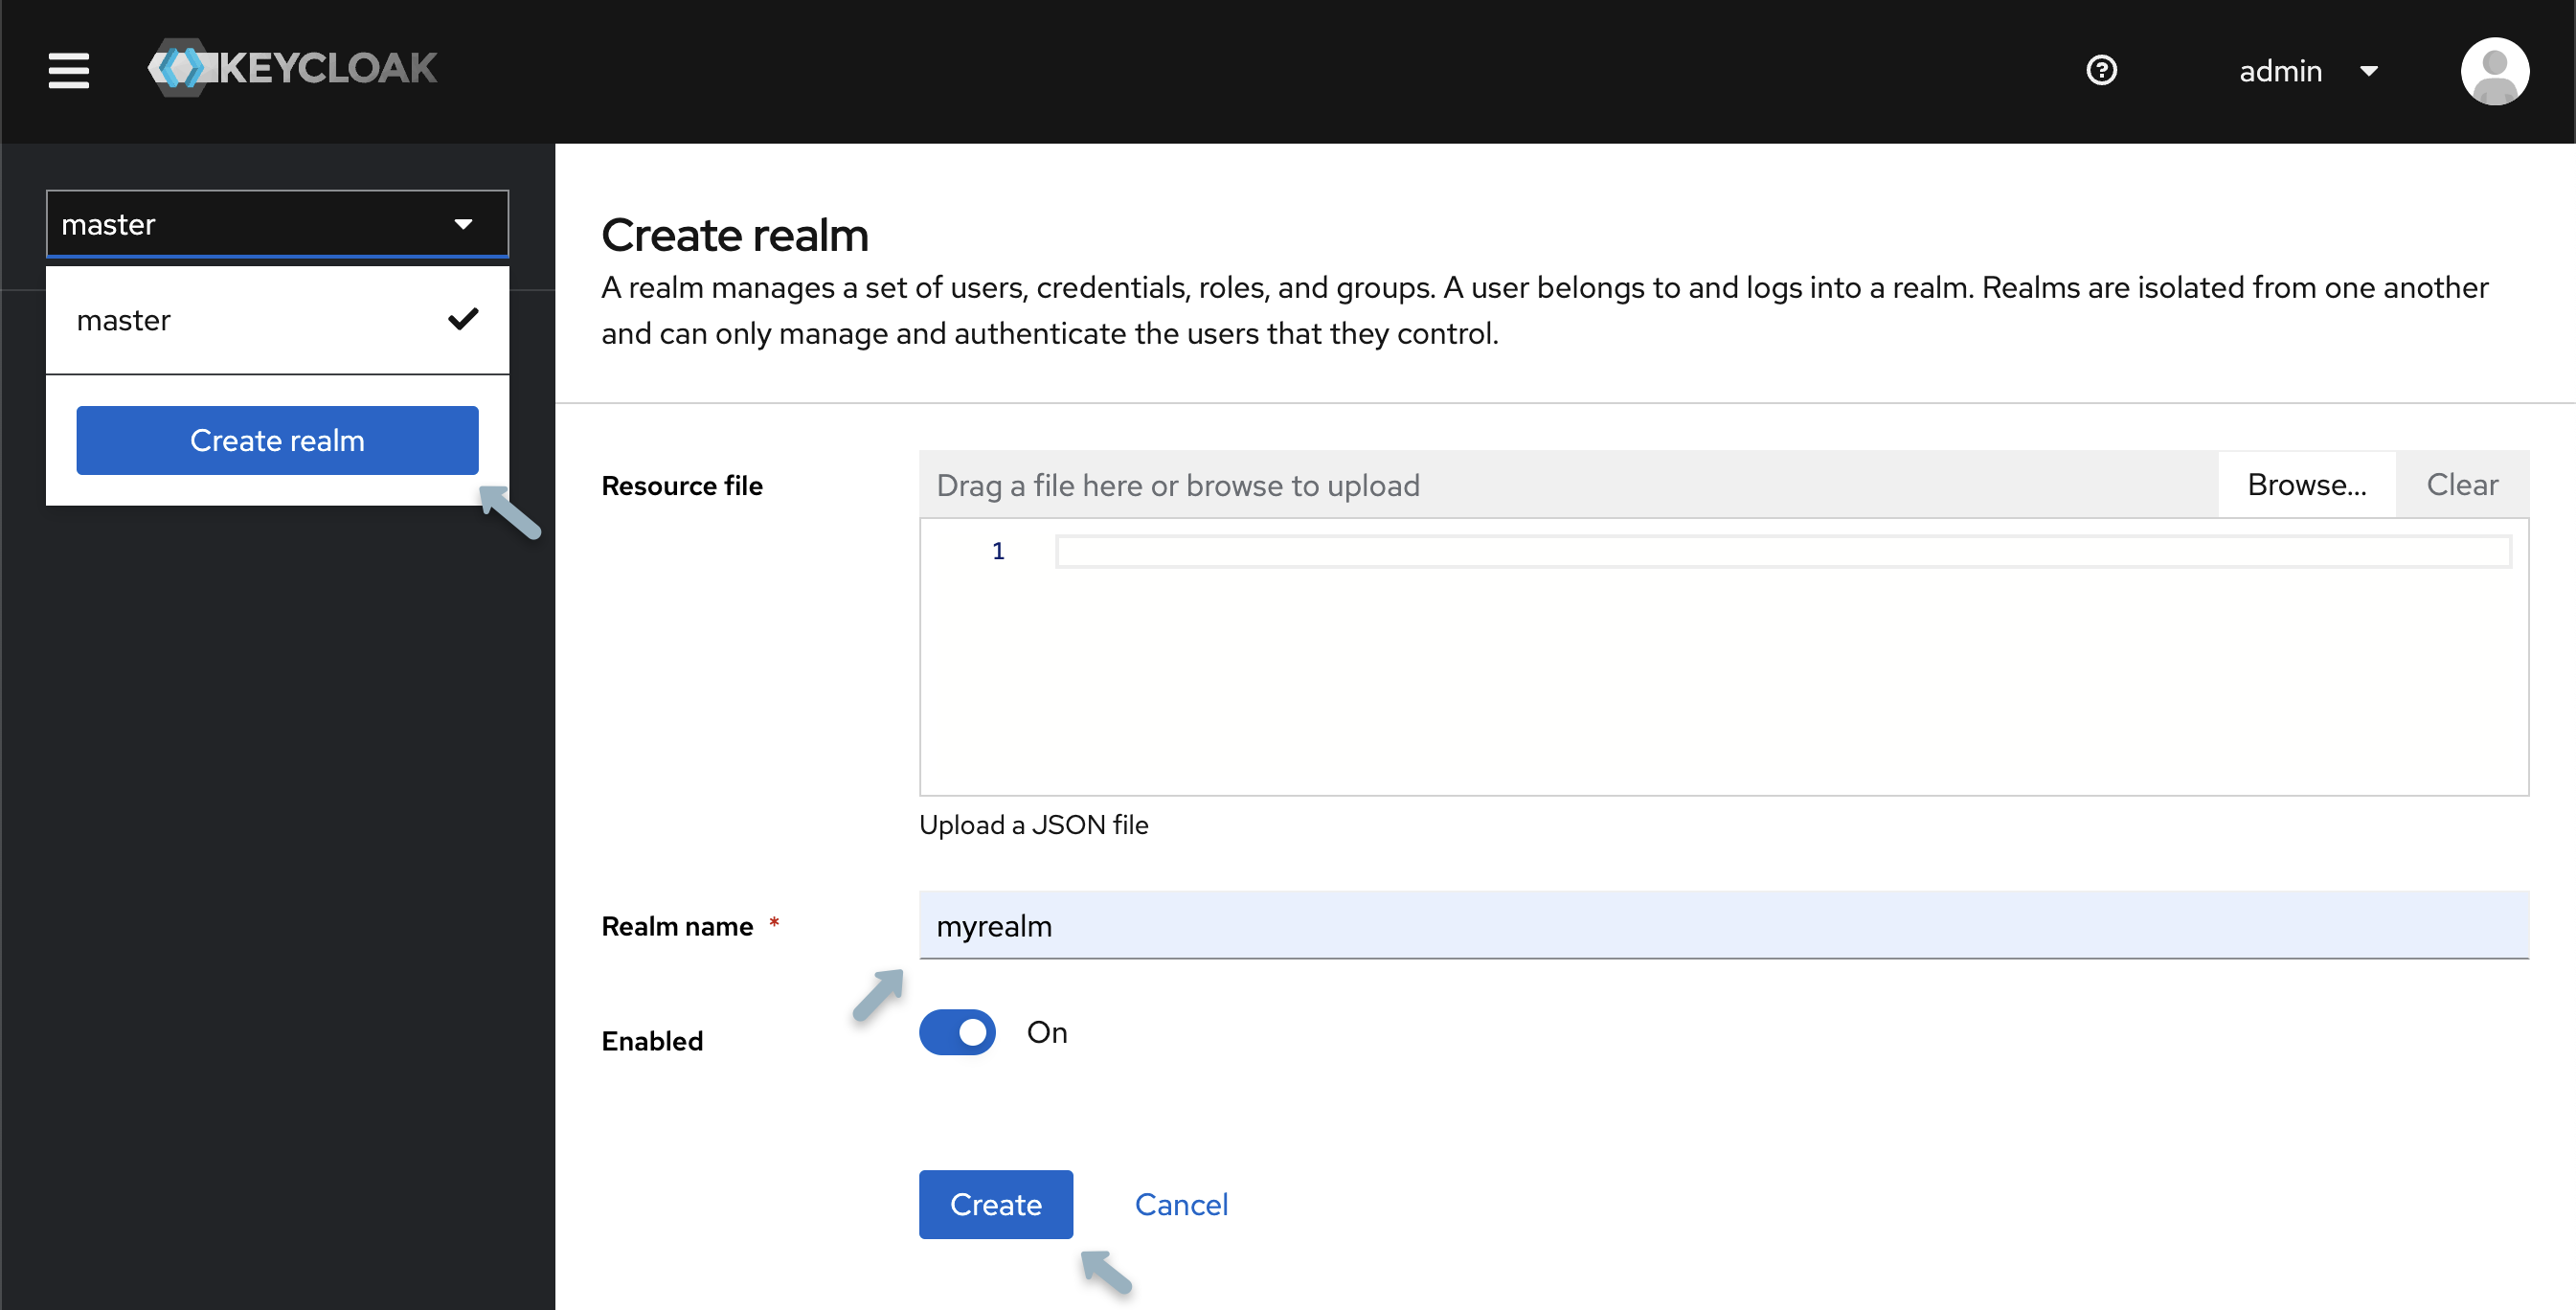
- Open the Keycloak Admin Console.
- In the top-left corner, select "master", then choose "Create Realm".
- Type
myrealmin the Realm Name field and select "Create".
Creating a group
As an example, we will create a data submitters group. After, we will configure and apply the appropriate permissions for this group.
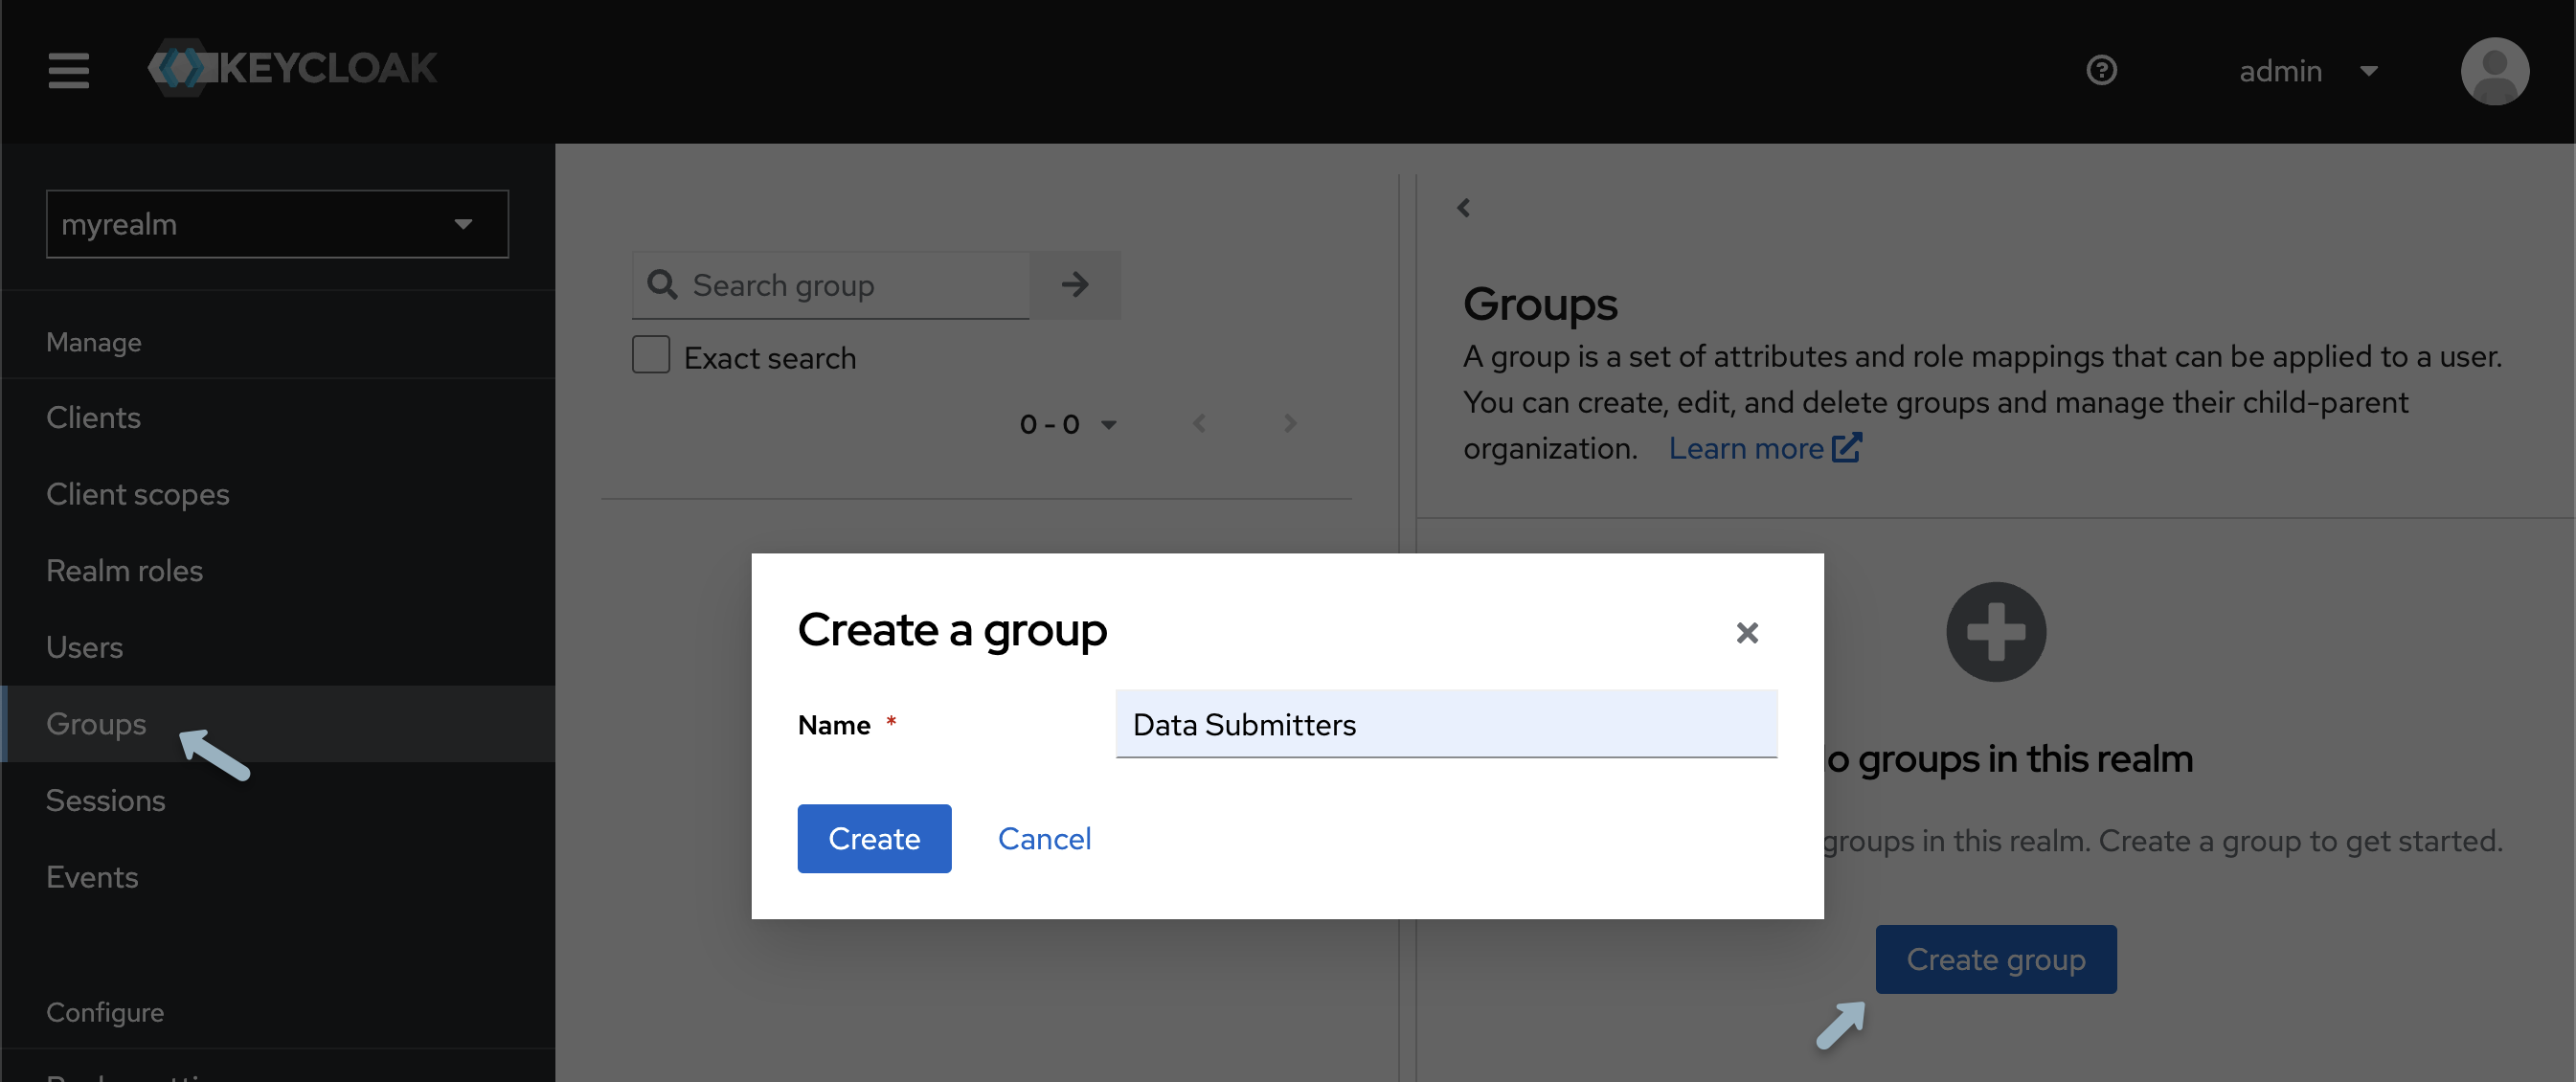
-
From the left-hand panel, select "Groups" and click "Create group".
-
Name the group
data submittersand select "create".
Creating a User
To populate the realm with its first user:
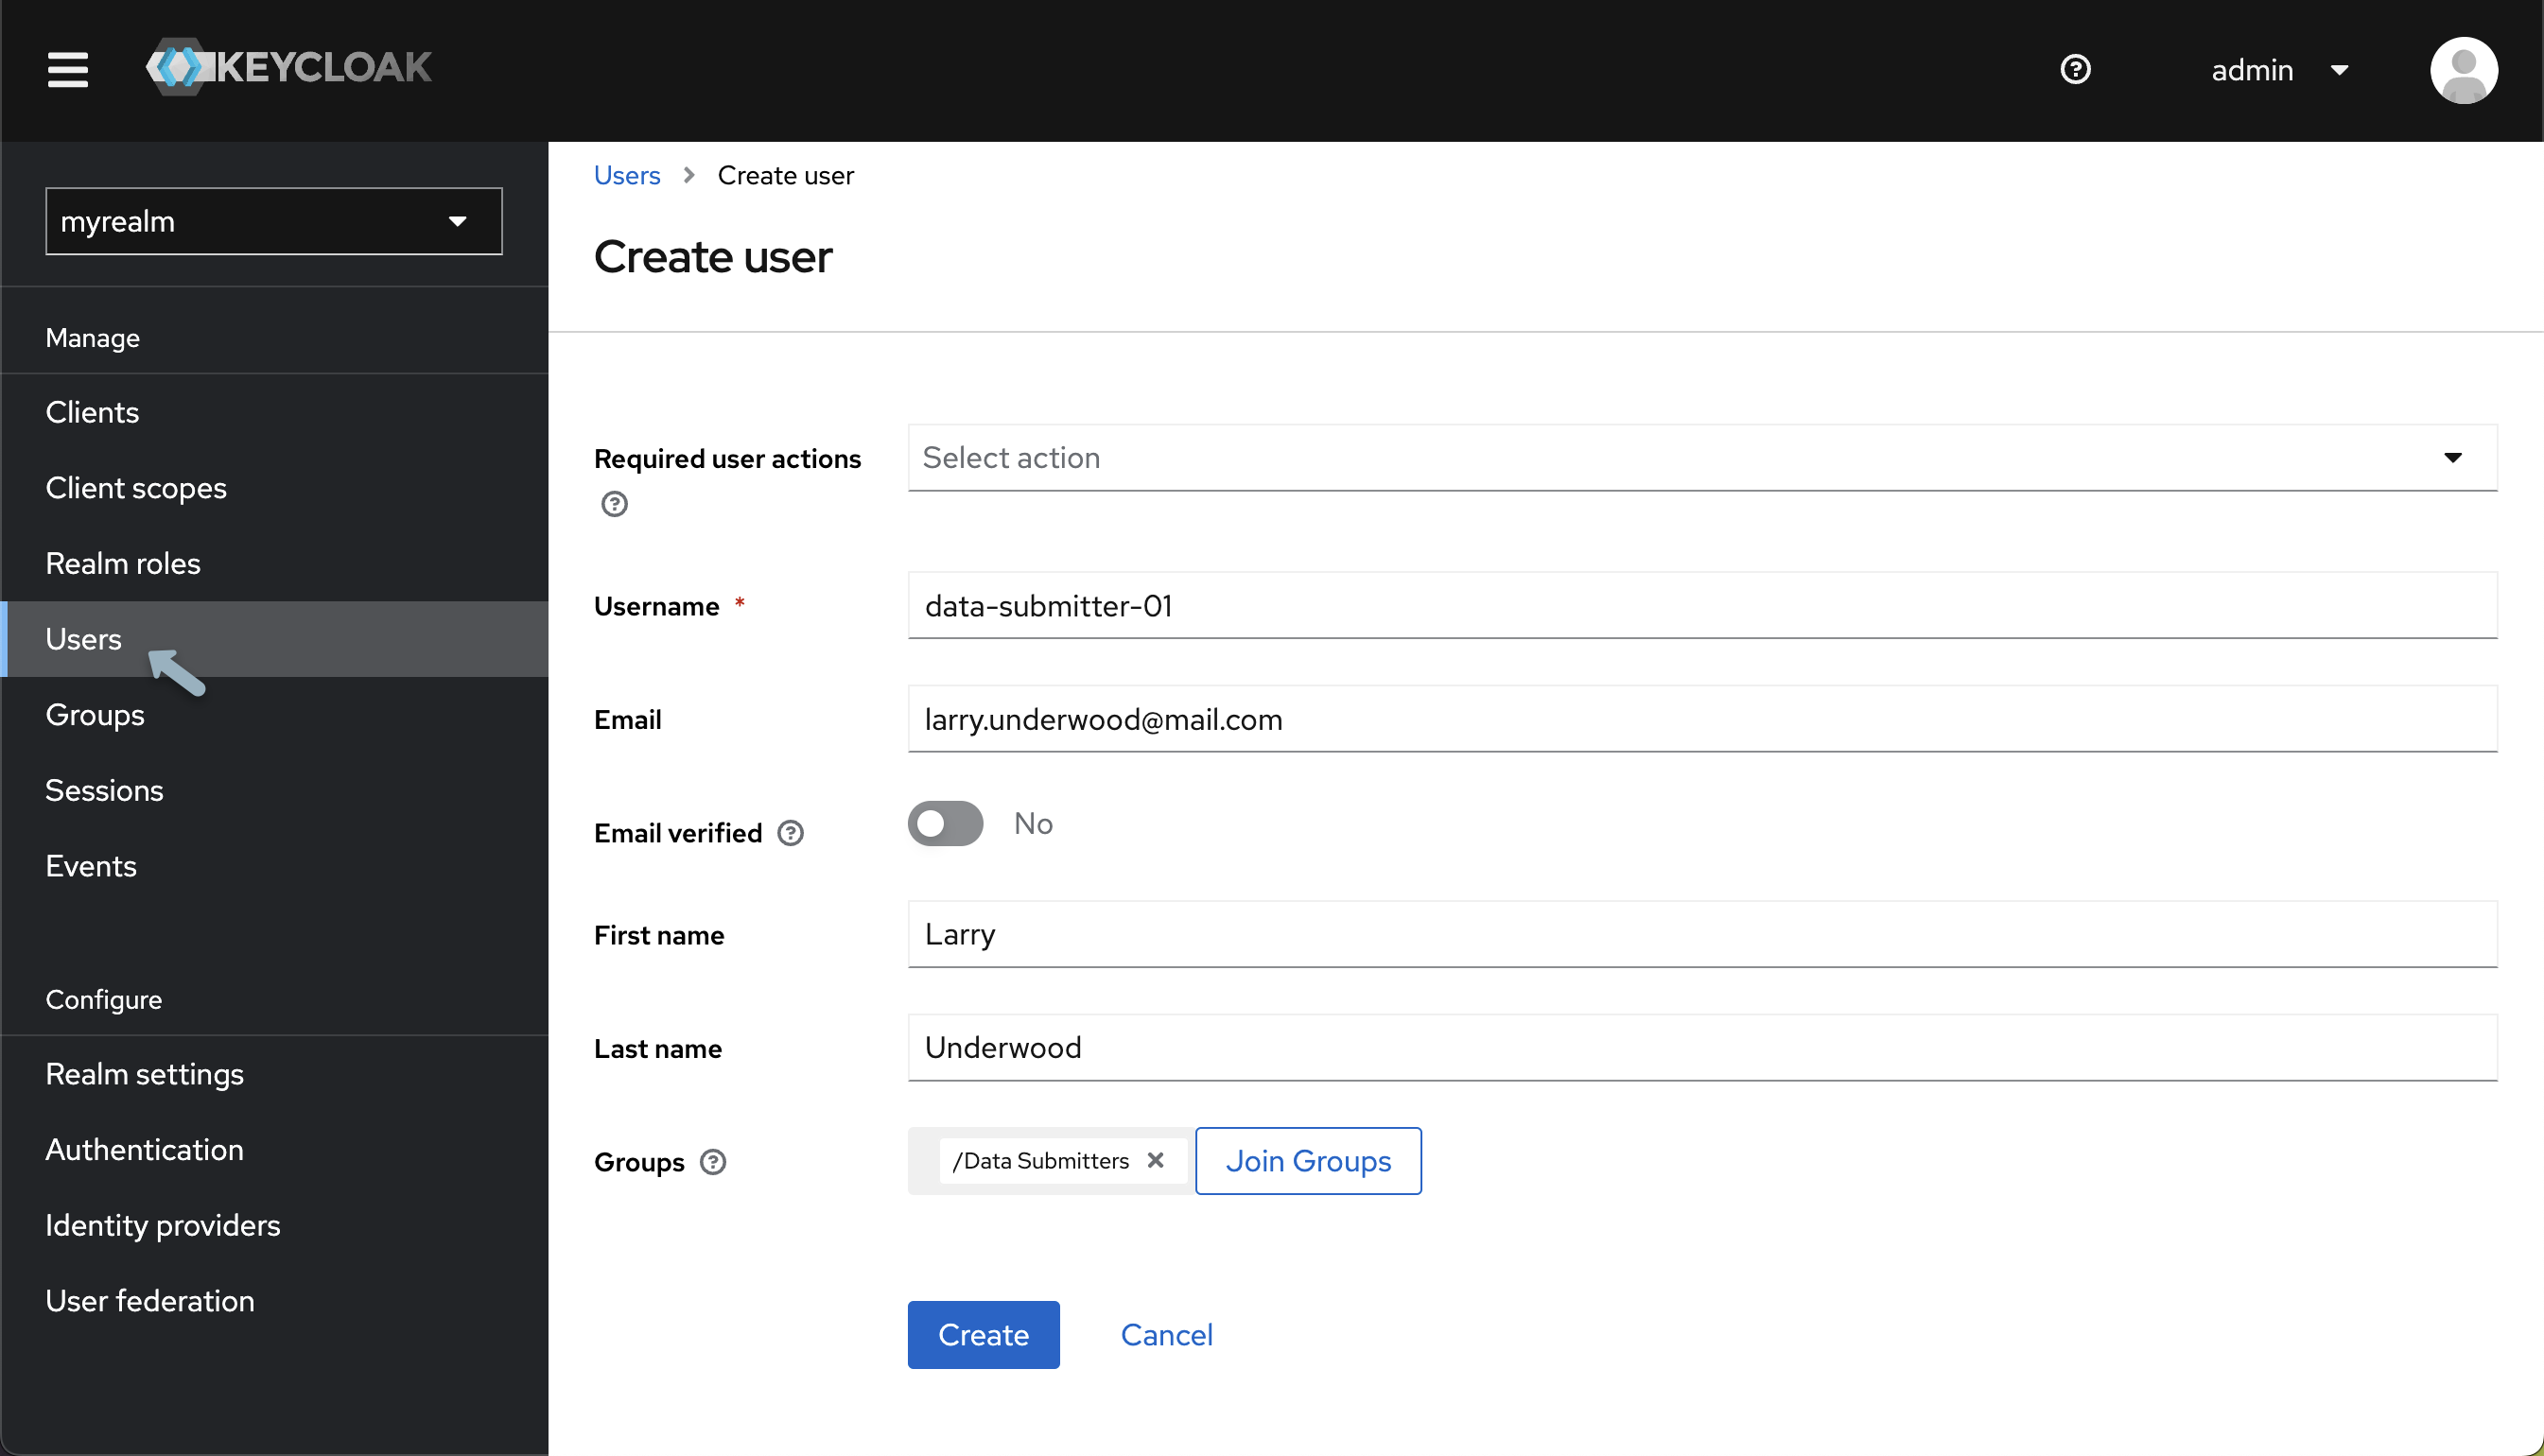
-
From the Keycloak Admin Console, under your newly created realm from the left-hand menu select "Users" and click "Add User".
-
Input your details, and then click "Create".
Keycloak User AdministrationVarious configurations can be applied to new users, detailed information can be found within Keycloaks official Server Administration documentation
Next, a password must be established:
-
At the top of the User details page, select the "Credentials tab"
-
Input your Password. To avoid mandatory password updates upon first login set "Temporary" to "Off"
-
Using the newly created username and password login to the Keycloak Account Console accessed from
http://localhost:8080/realms/myrealm/account/.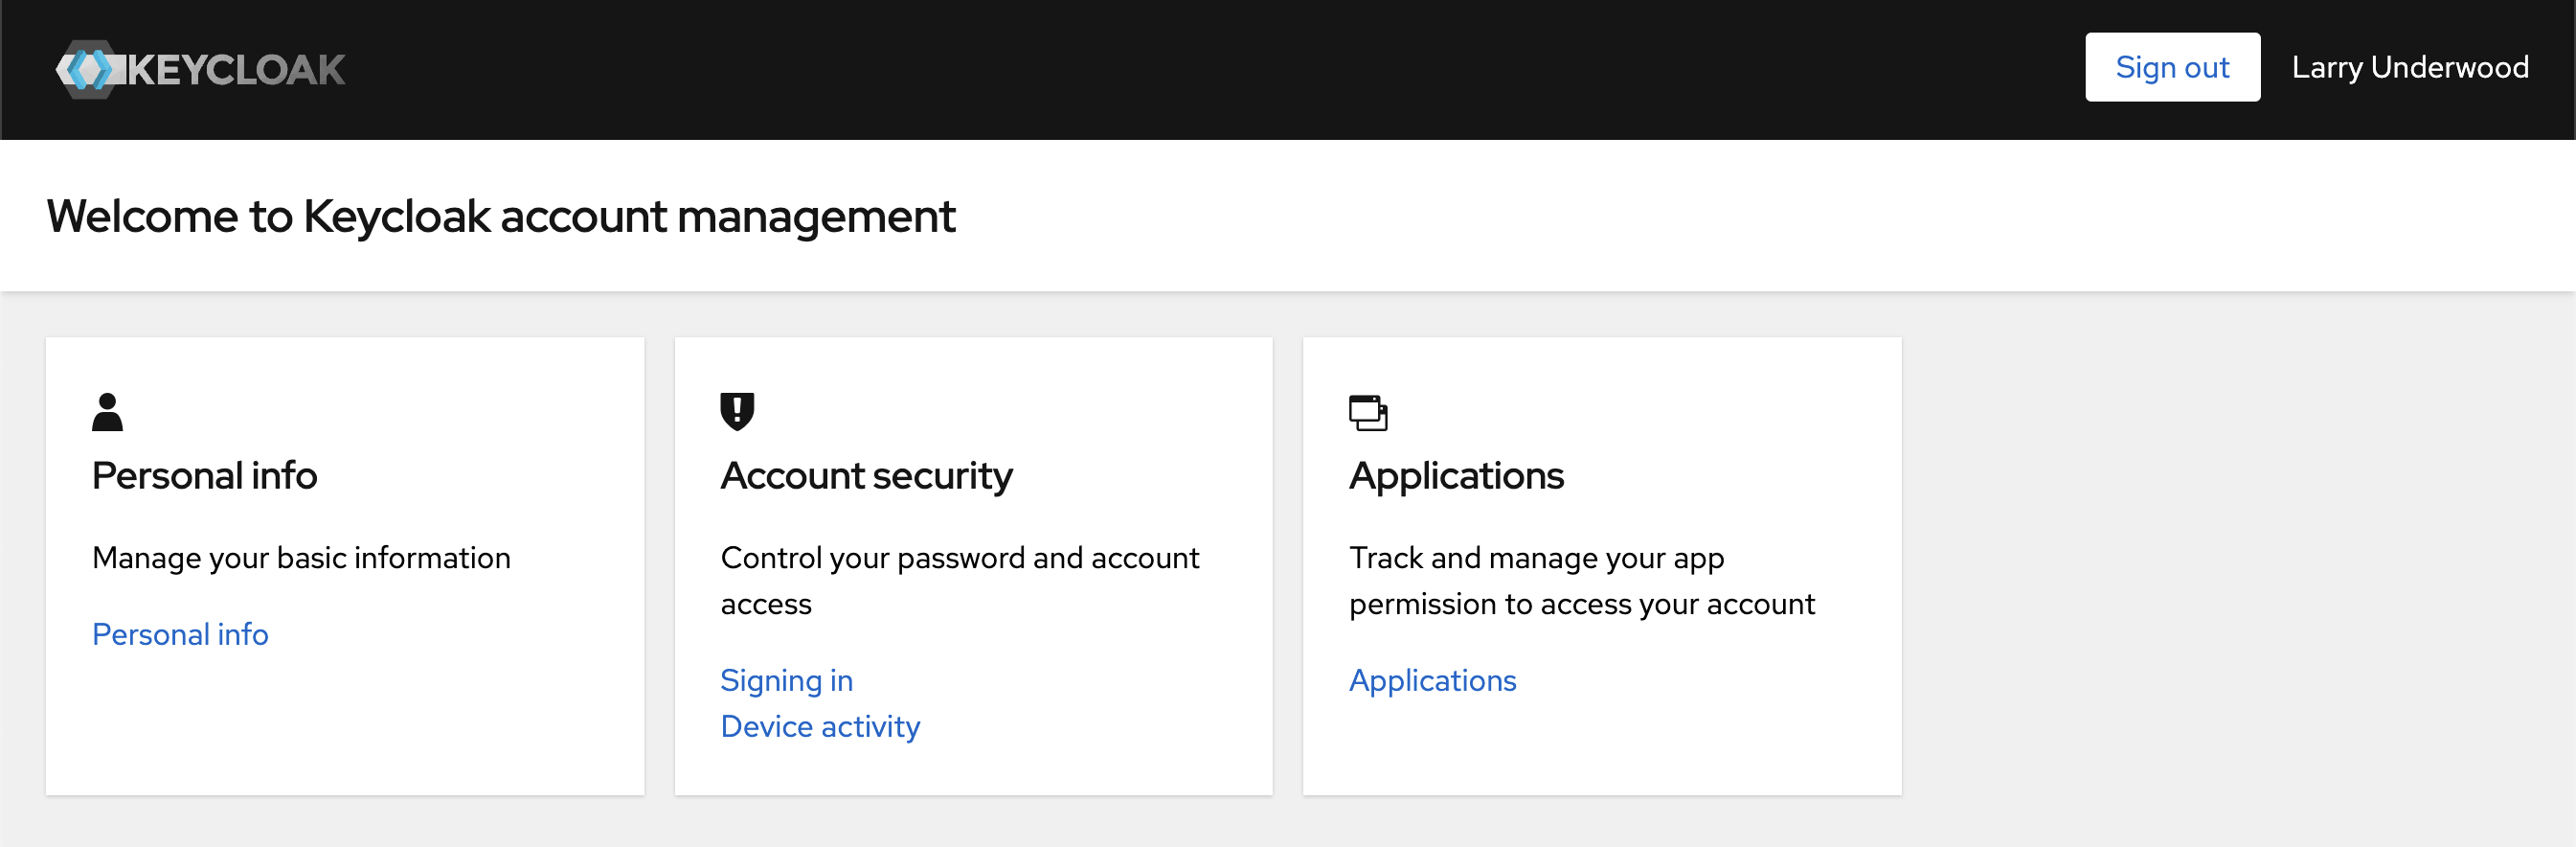
From the Account Console, users can manage their accounts, modify profiles, activate two-factor authentication, and link identity provider accounts.
Application Setup
Before we set up and apply permissions we must create a "client" for the Song API.
-
Re-open your Keycloak admin console located at
<url>/adminand confirm you are within your recently created realm. -
Select "Clients" and then "Create client" and input the following:
Field Value Client Type OpenID Connect Client ID song-api -
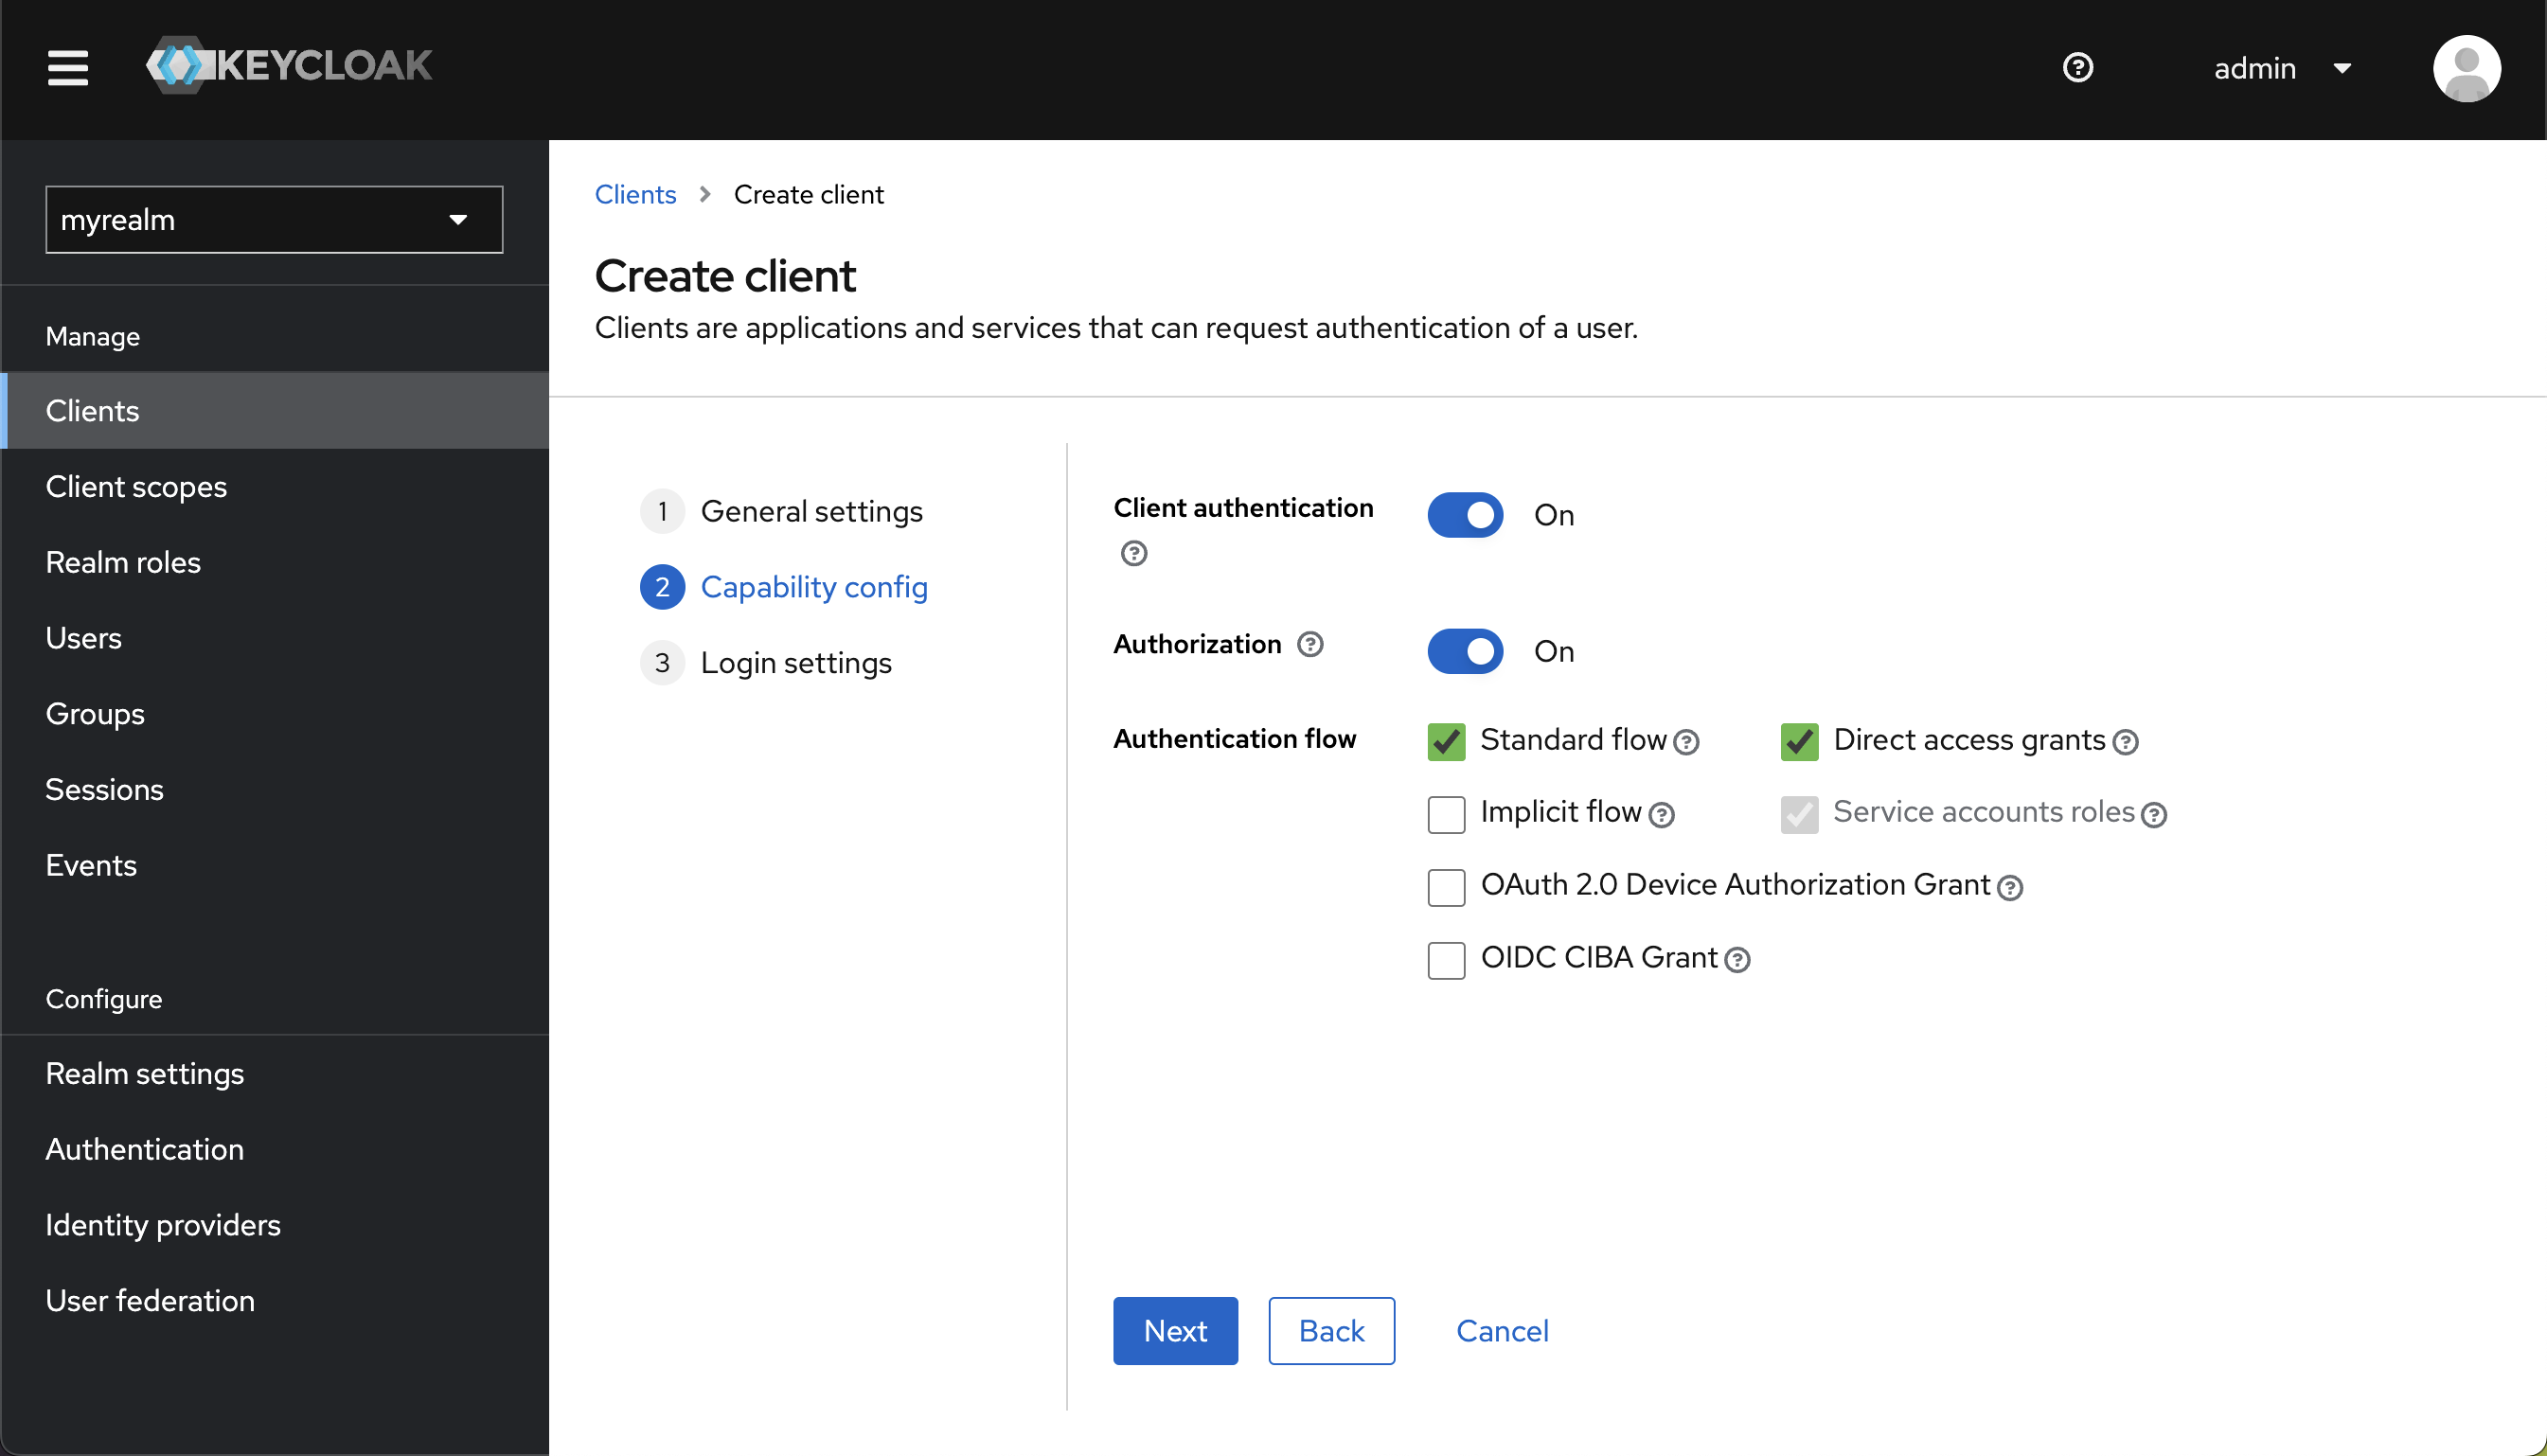
Select "Next" and turn on Client Authentication, confirm Standard flow is enabled, turn authorization on and then click "next" and then "Save" (Nothing needs to be inputted for login settings).
 Important
Make sure you have toggled on both "Client Authentication" and "Authorization"
Configuring your Application
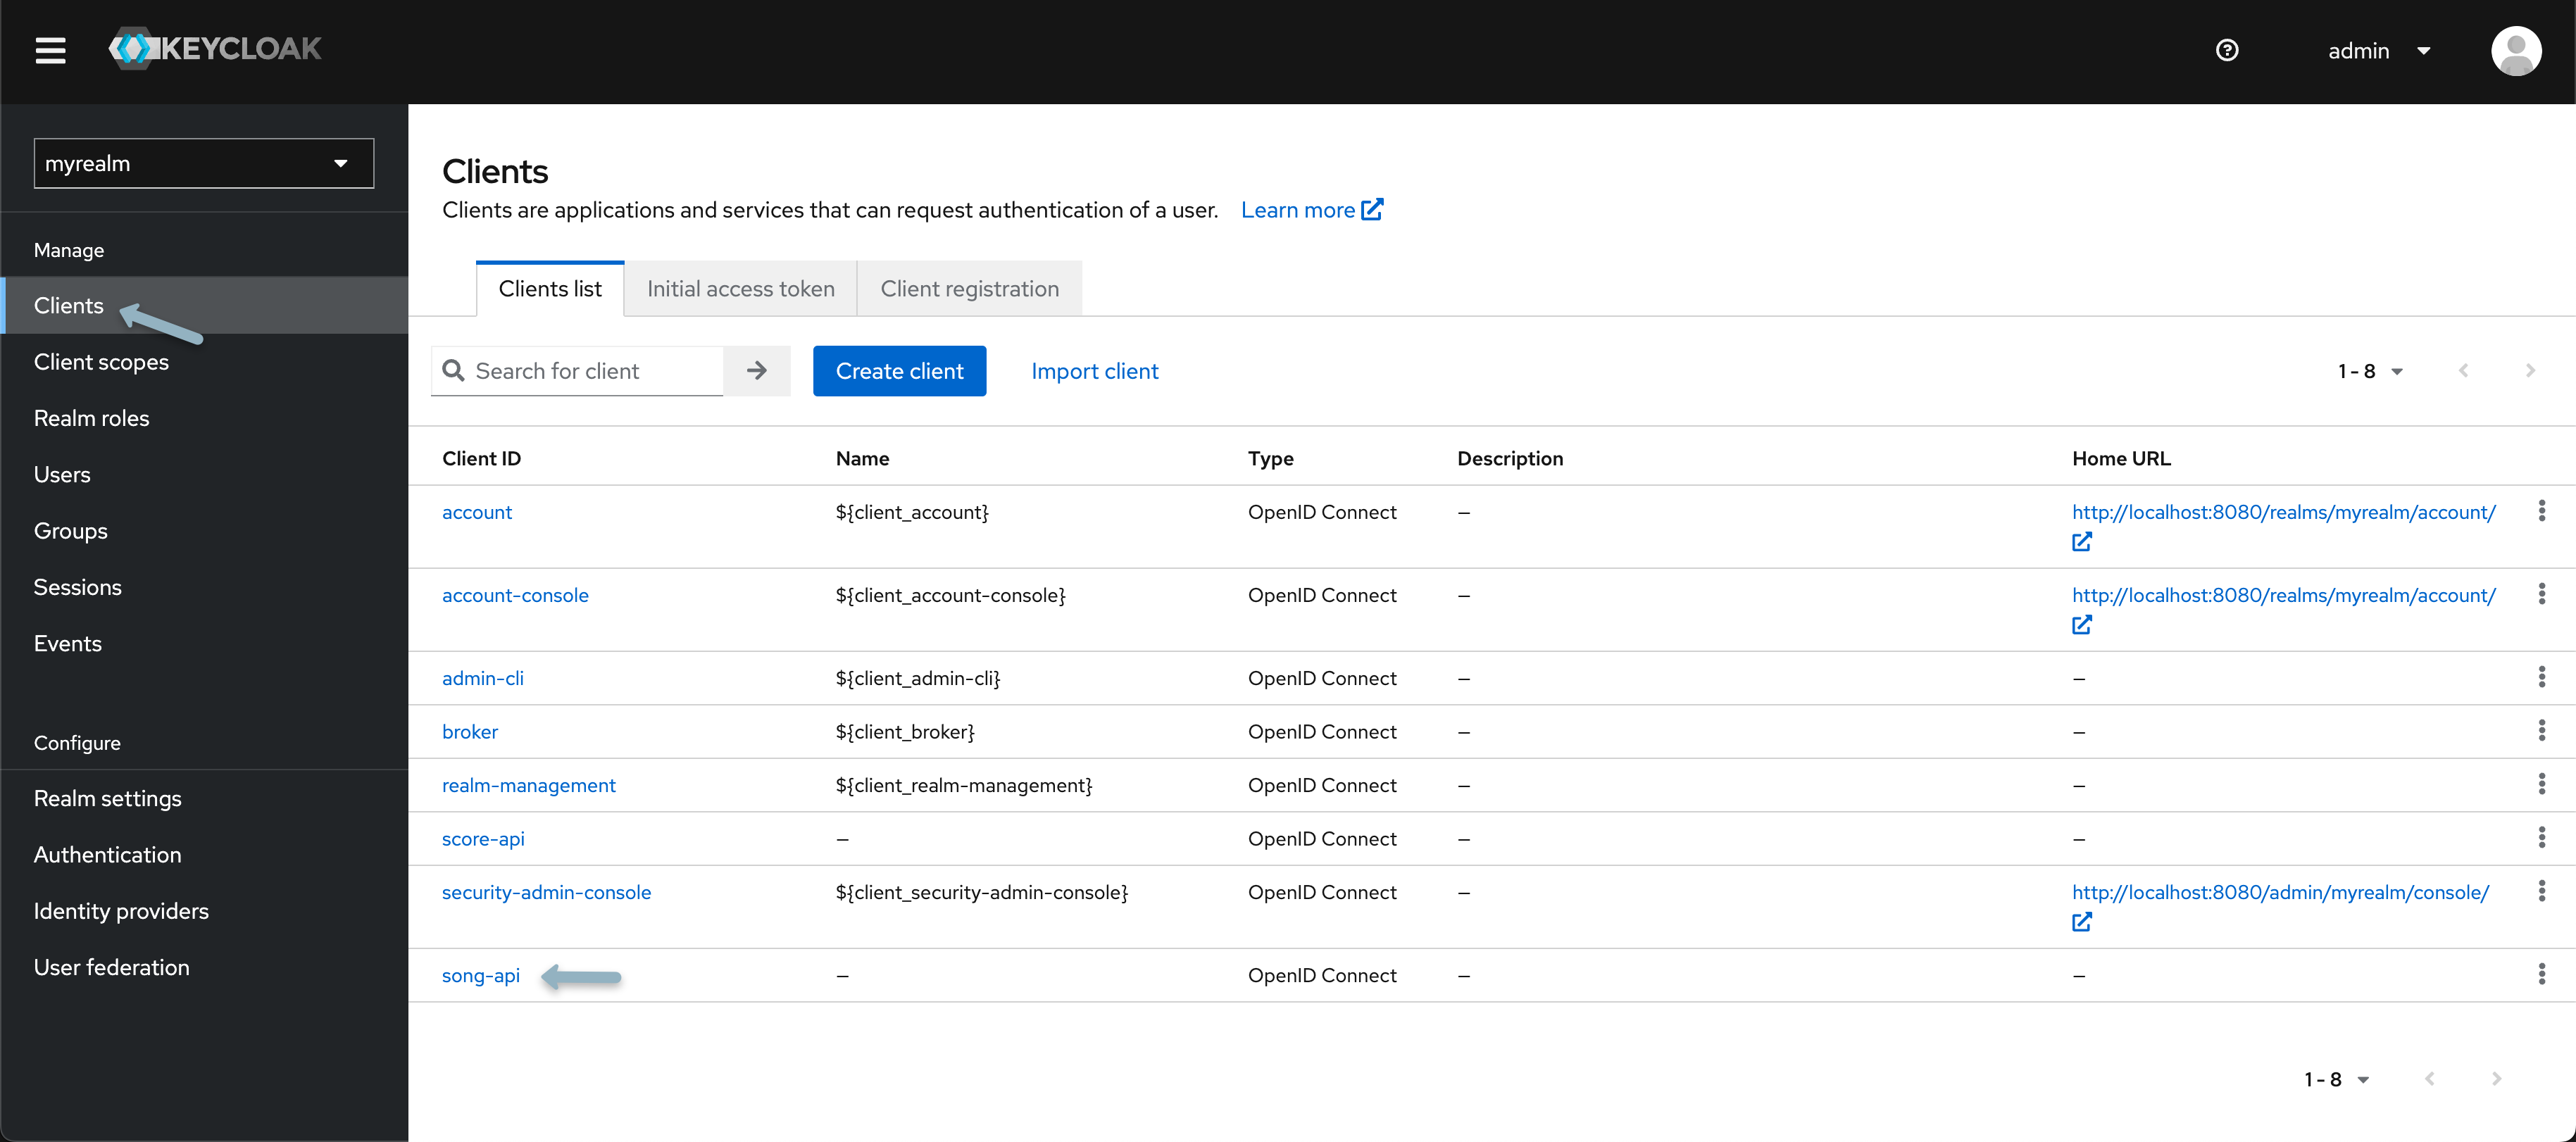
After creating our client, the next step is configuring the resource name, scopes, policies, and permissions. All these settings can be adjusted within the Authorization tab of the client you've just created. To access your client select "Clients" from the left-hand navigation menu and from the "Client list" select the newly created client.
Scopes
Scopes represent actions that users can perform on a particular resource. They define the level of access a user has to a resource, such as reading, writing, updating, or deleting. For more details, checkout the following Keycloak documentation
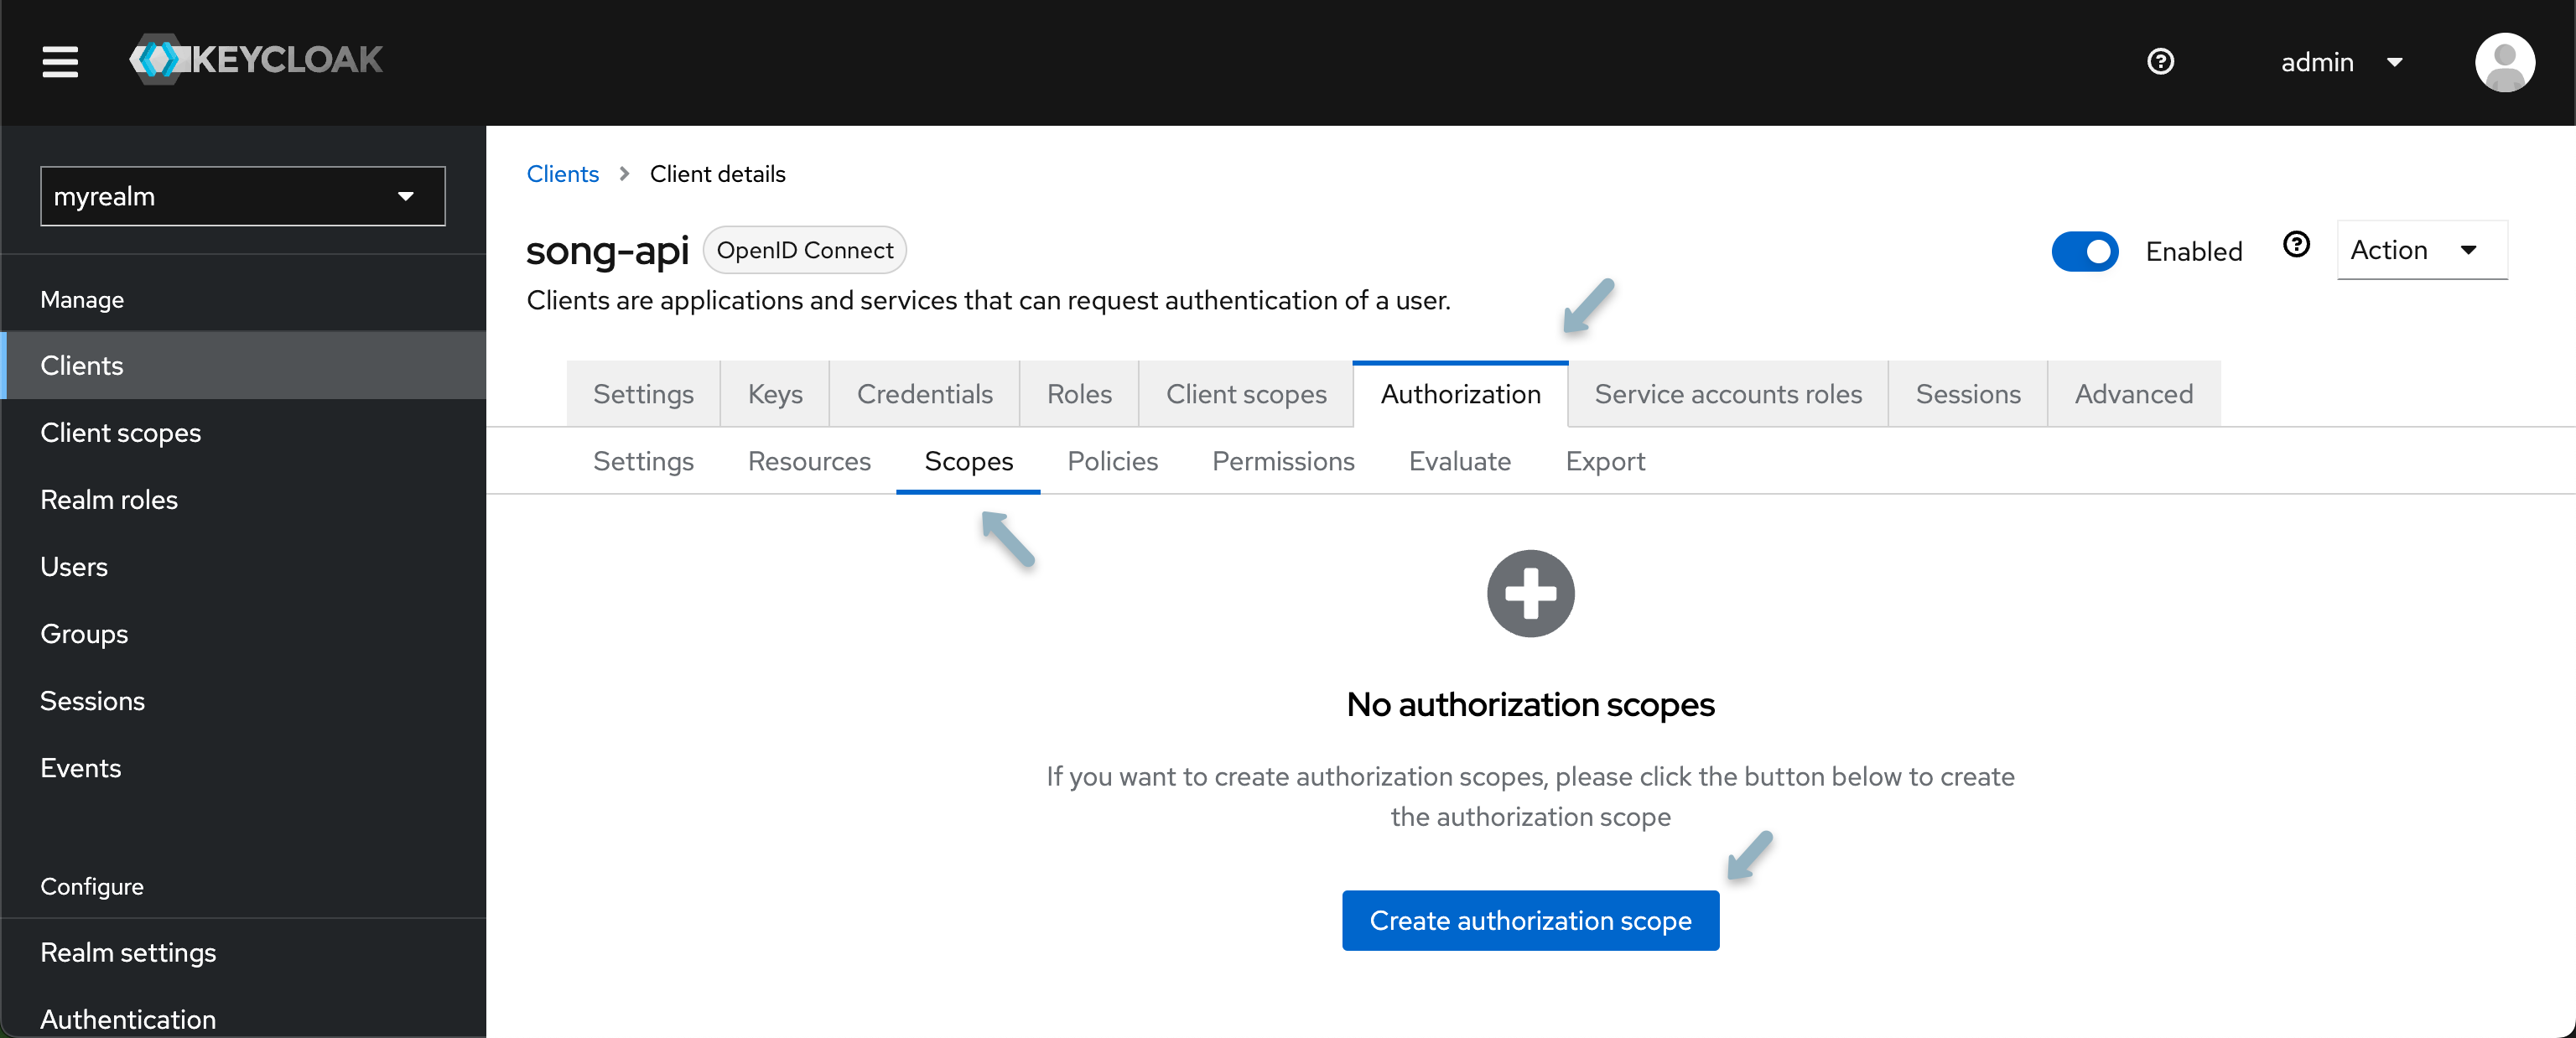
- Navigate to the Scopes tab and select "Create Authorization Scope"
- Create two authorization scopes, one for READ and one for WRITE access.
Resources
Resources are objects or entities that users can interact with, such as a database, a file, or an API endpoint. When defining resources, you assign them to specific scopes, indicating what actions can be performed on those resources. For more details, checkout the following Keycloak documentation
-
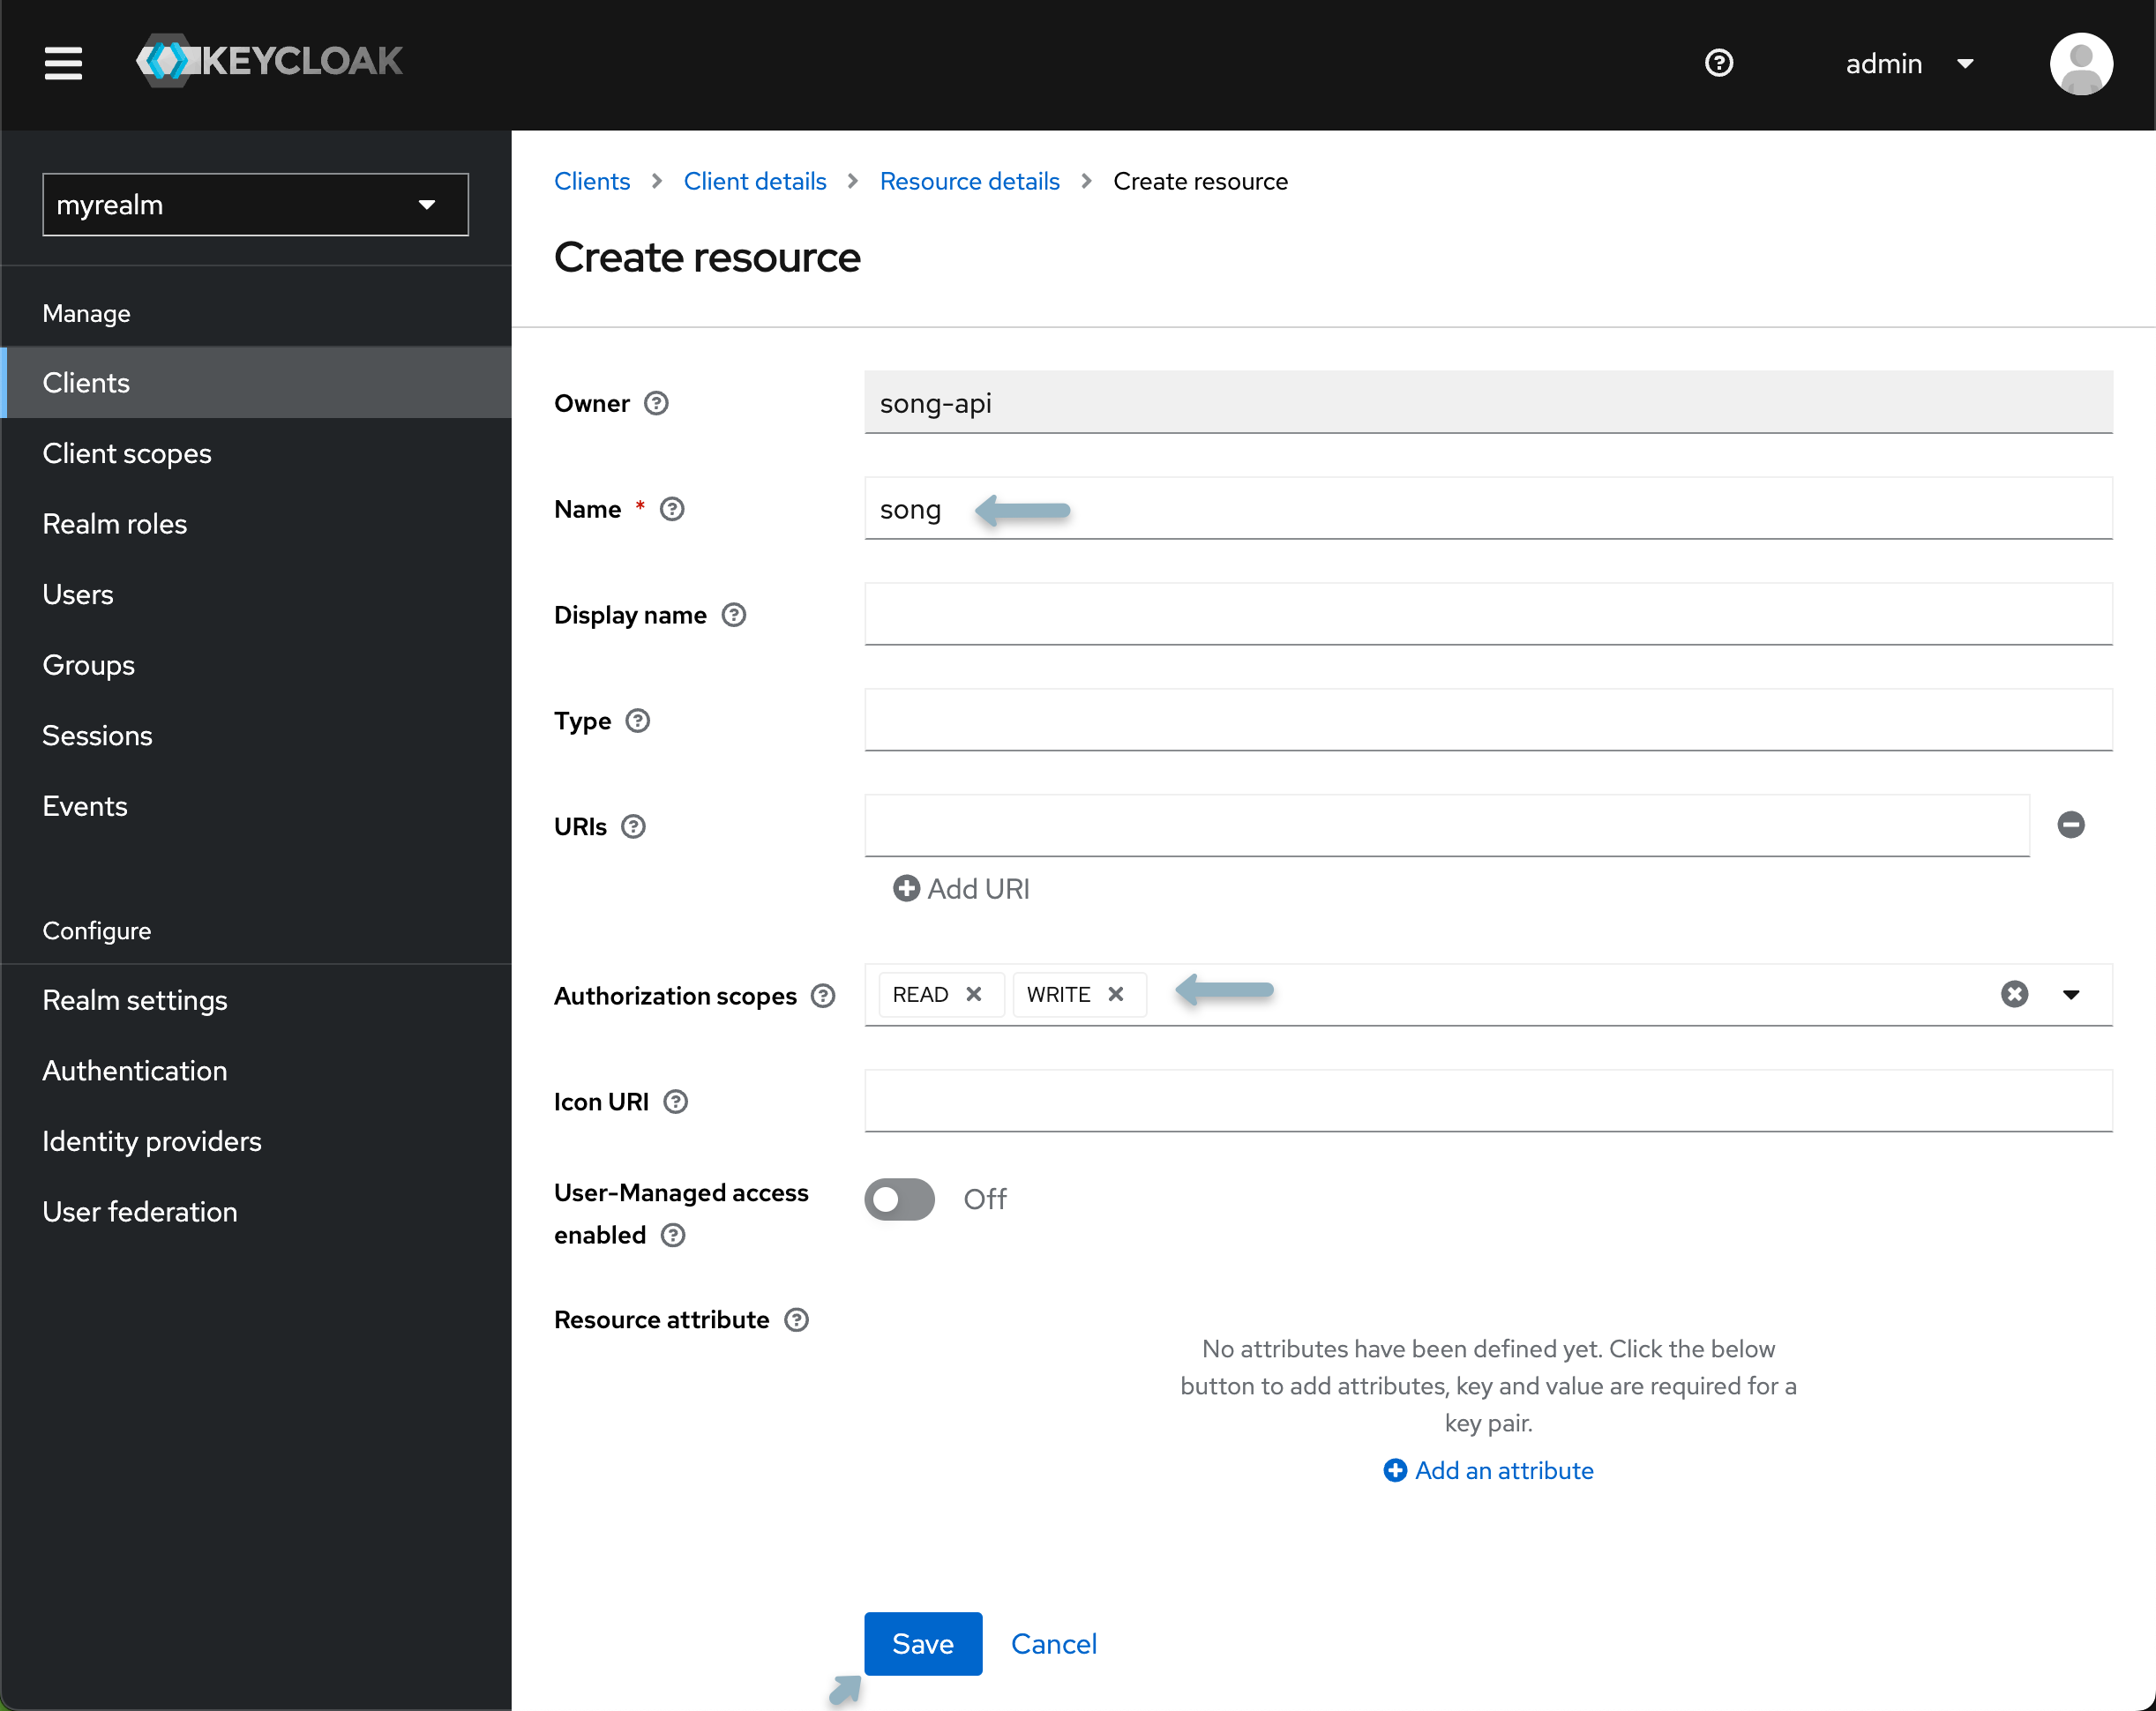
From the Resource tab, select "Create Resource".
-
Your first resource is generalized and will not be associated with any specific study or program. Name the resource
score, and from the authorization scopes field dropdown select "READ" and "WRITE". -
Click save and return to the client details page.
 Introducing New Studies or Programs
When introducing a new study or program, the creation of an additional resource within Keycloak is required. This includes re-applying the following policies, scopes, and permissions to desired users and groups.
Policies
Policies are rules that determine who can access resources based on certain conditions. They encapsulate the logic to decide whether to grant or deny access. Policies can be based on group membership, user attributes, or time-based conditions. For more details, checkout the following Keycloak documentation
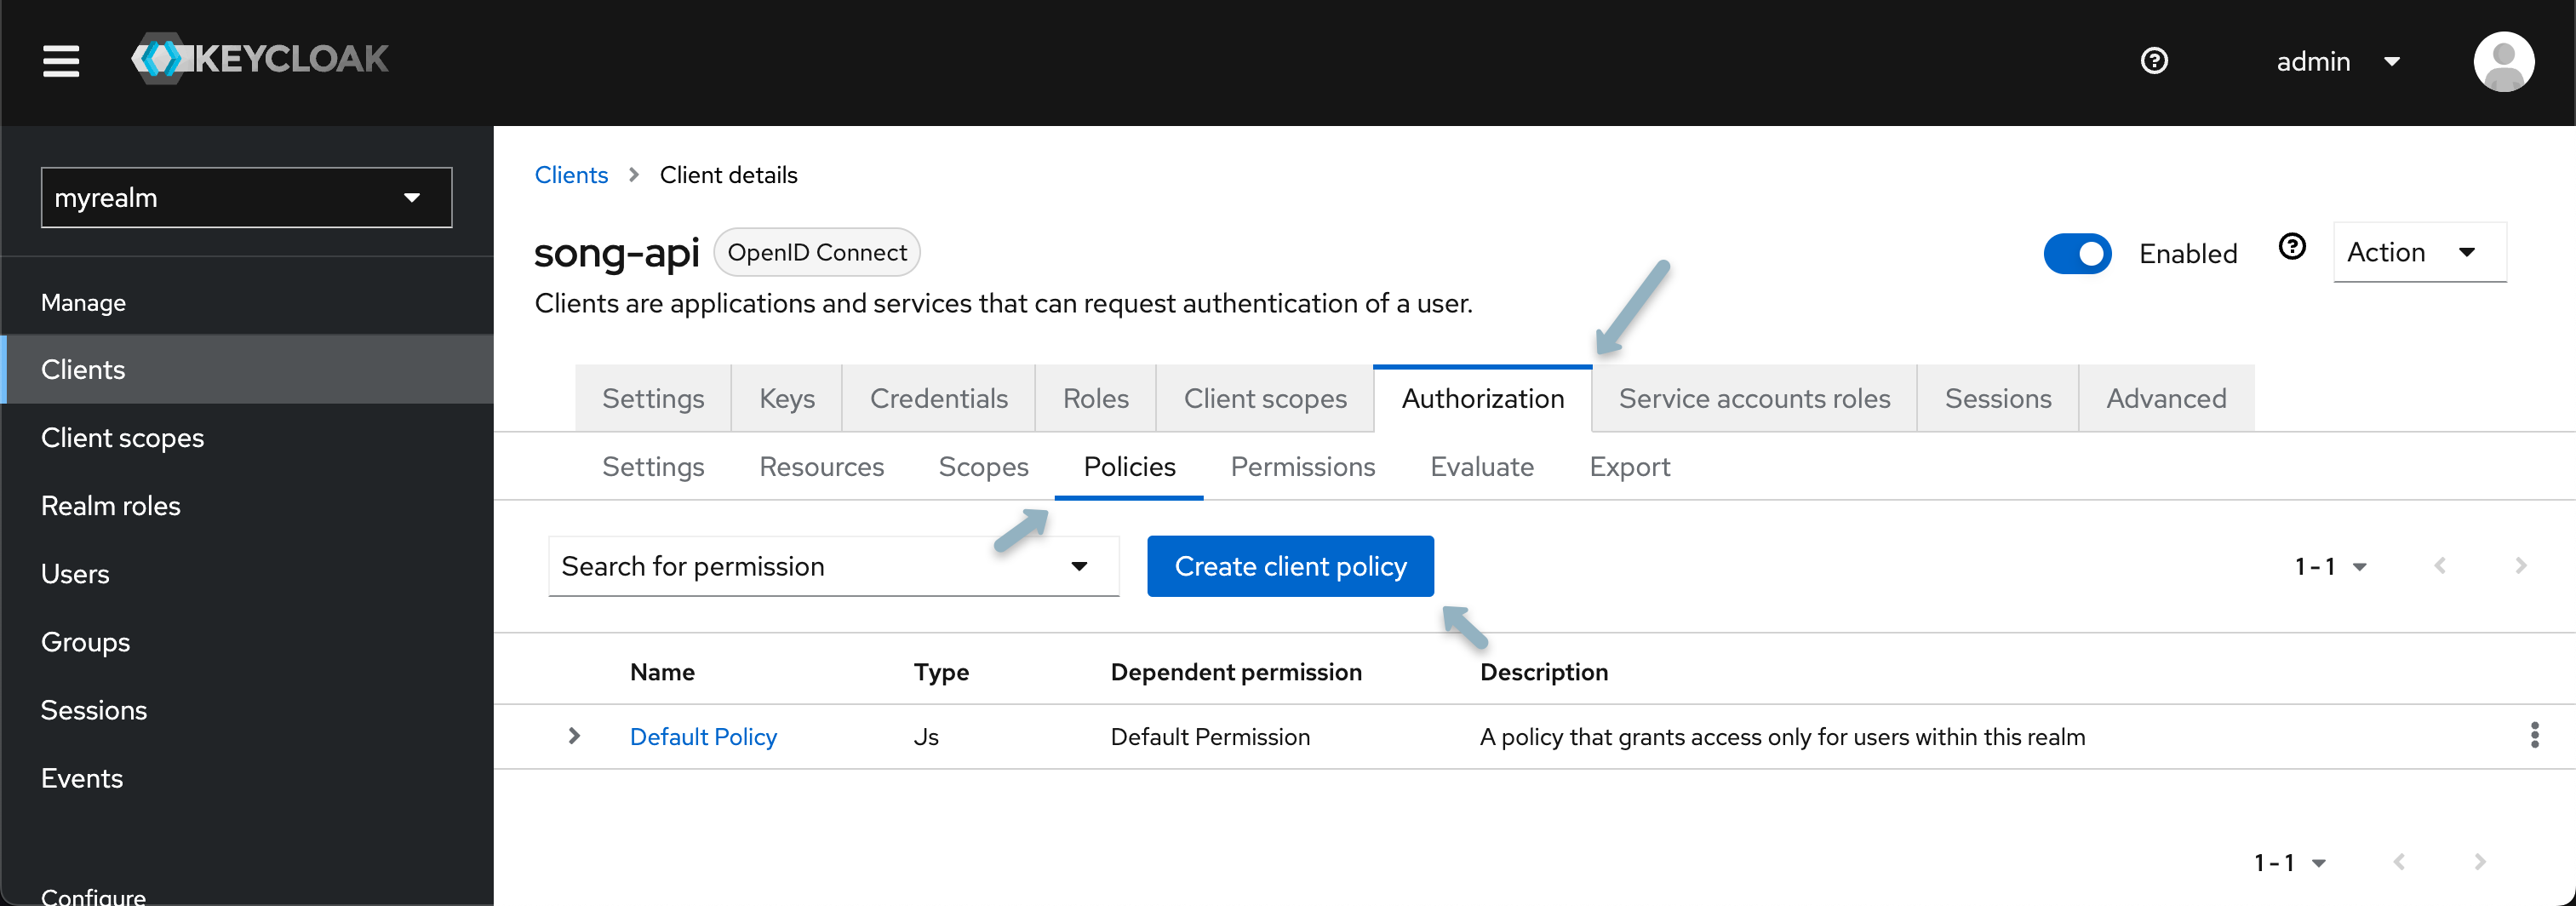
- Select the Policy tab and click "Create Client Policy"
- From the popup modal select "group policy".
- Name your policy (e.g.,
data submission policy) and select "Add groups from the modal check the box next to the Data Submitter group and click "Add" then "Save".
Permissions
Permissions are the final decision-making mechanism connecting resources, scopes, and policies. They define which users or groups can access which resources under what circumstances. Permissions are evaluated based on the evaluation strategy chosen (e.g., Affirmative, Unanimous, or Consensus). Permissions can be resource-based, meaning they apply directly to a resource, or they can be scope-based, meaning they apply to a scope or combination of scopes and resources. For more details, checkout the following Keycloak documentation
- Select the permissions tab, click "Create Permission" and from the dropdown select "Create resource-based permission.
- Assign the newly created resource, scope, and policy. Select
Affirmative strategy.
Creating a New Study
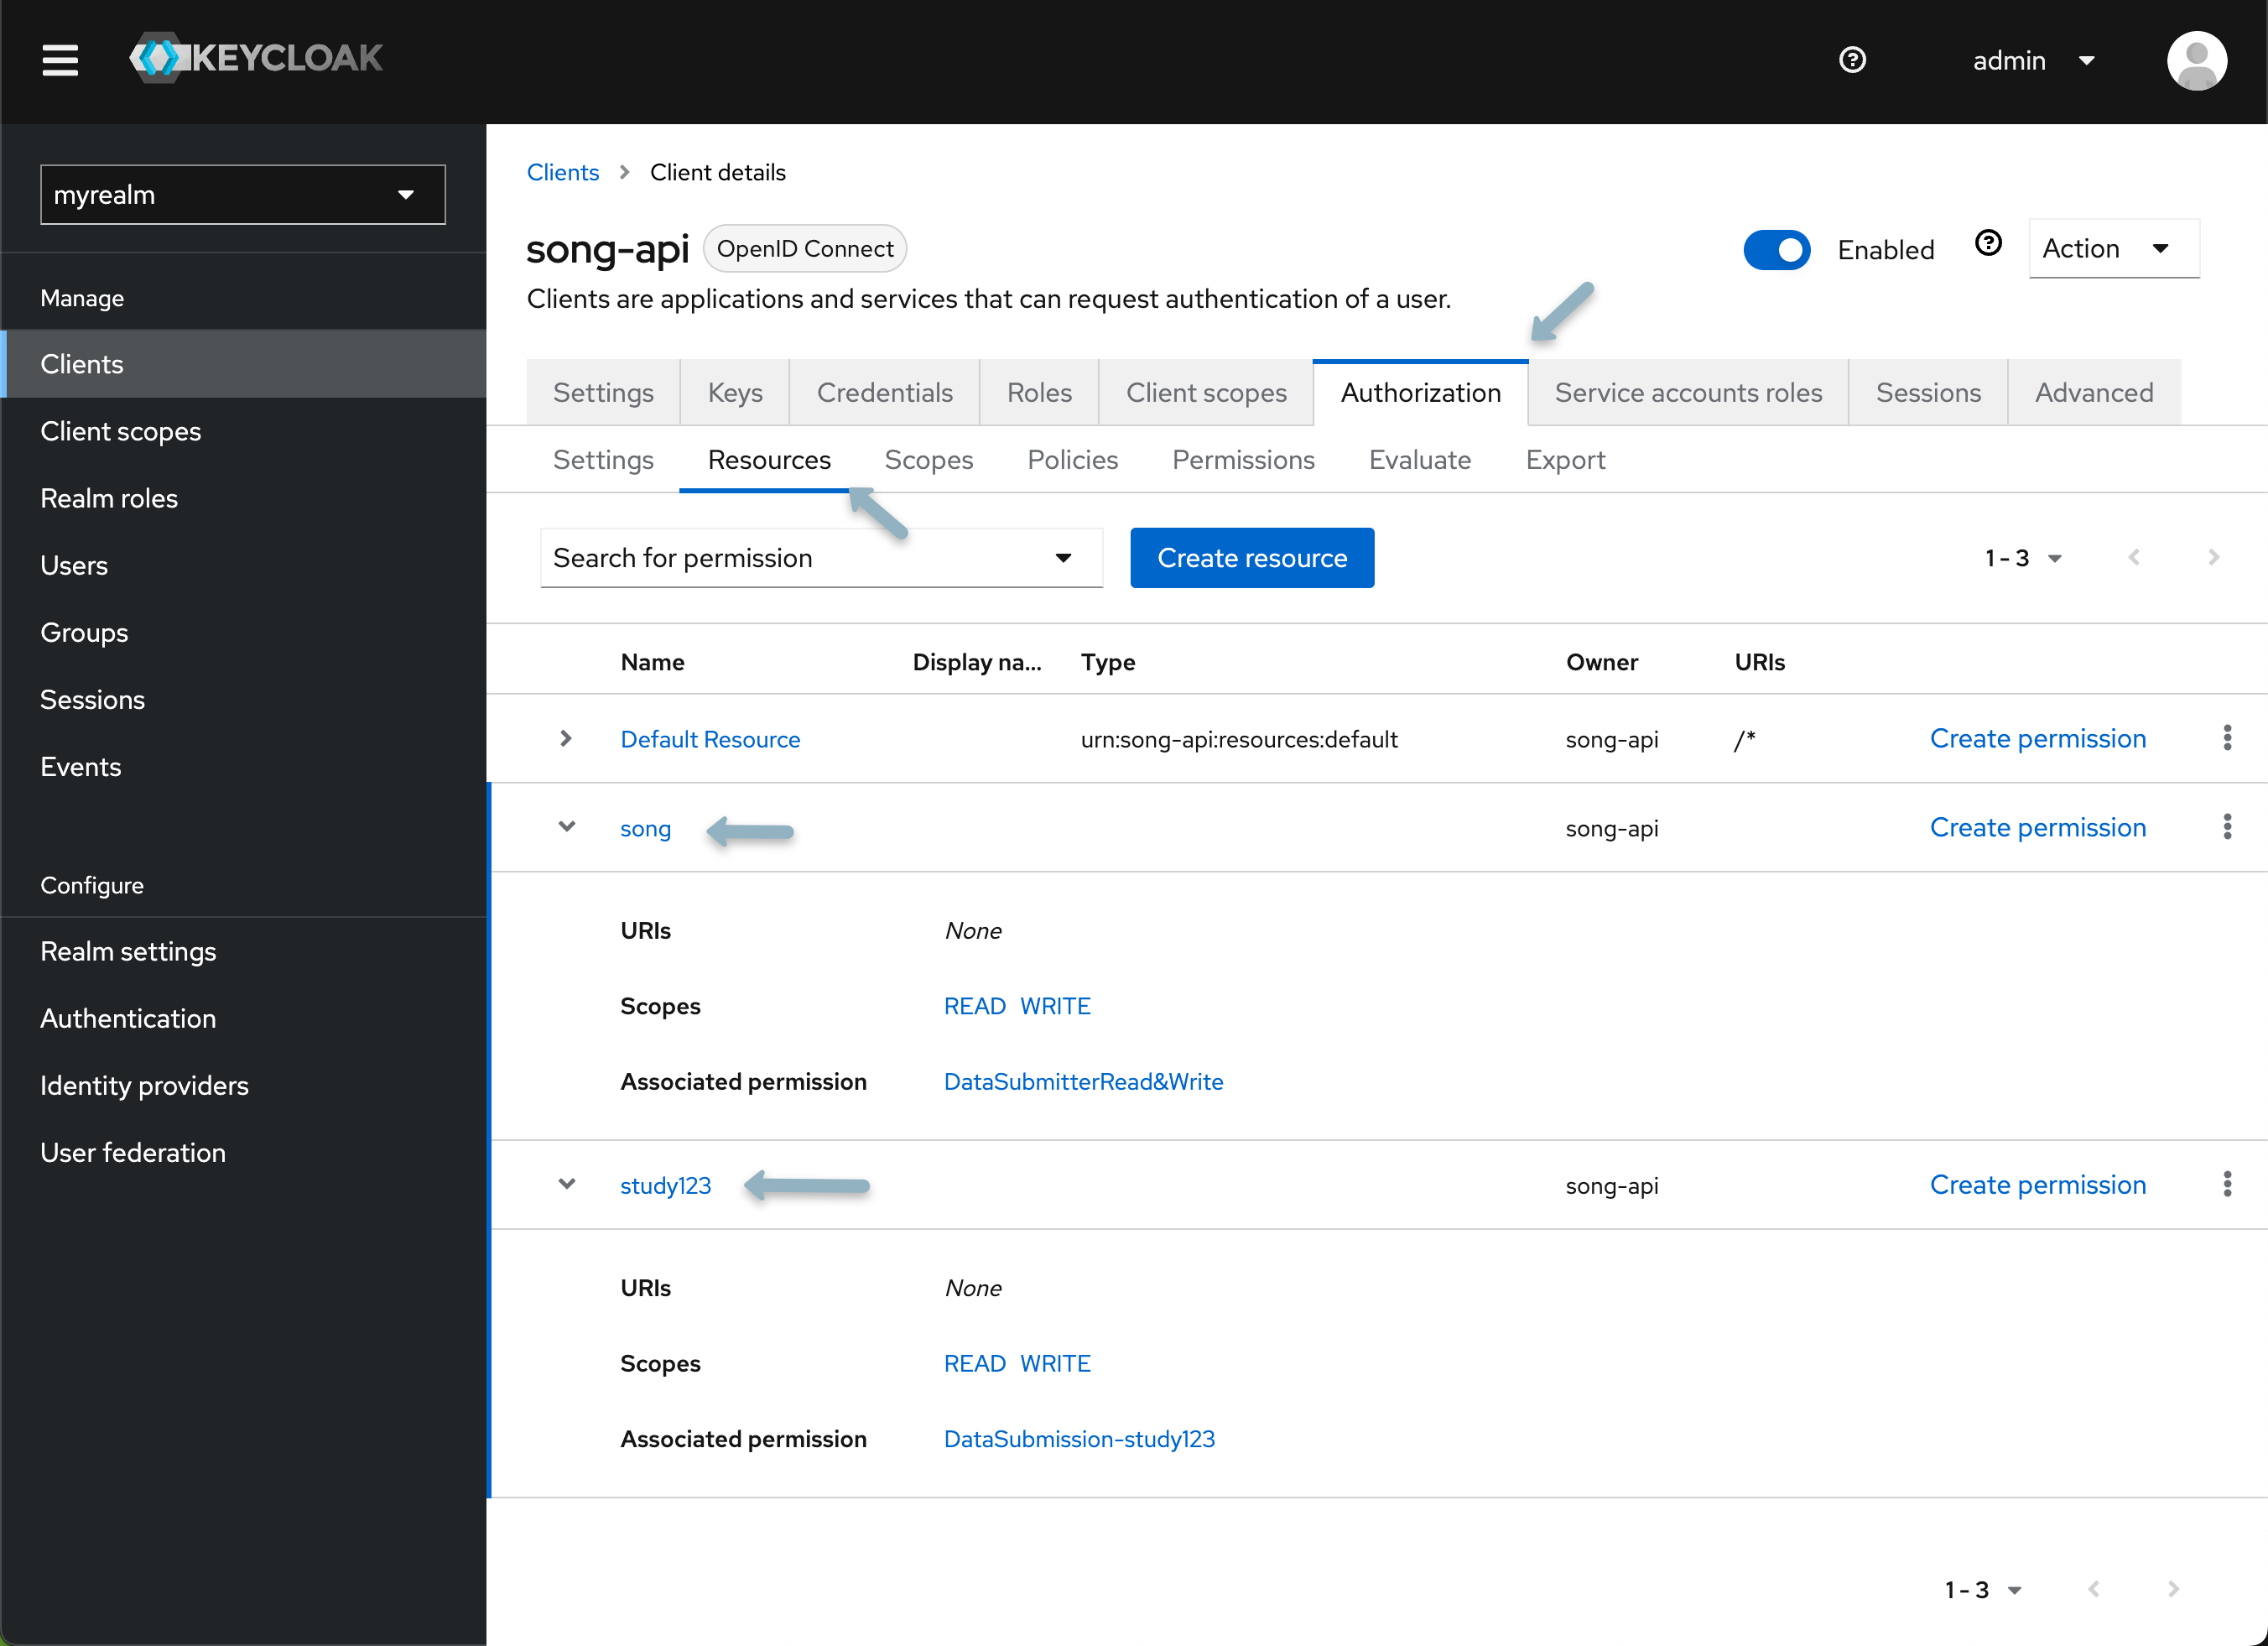
As mentioned previously, when introducing a new study or program, the creation of an additional resource within Keycloak is required. This includes re-applying policies and permissions to desired users and groups.
To add a new study, create a new resource with the desired name of your study or program (i.e. PROGRAM.study123) and repeat the steps outline above, specifically the Resources, Policies and Permissions sections of configuring your application. Once complete you should have the following:
Integration with Song
Update your Song configuration by adding these Keycloak variables to your .env.song file:
# Keycloak Integration
SPRING_PROFILES_ACTIVE=secure

# Server Configuration
AUTH_SERVER_PROVIDER=keycloak
AUTH_SERVER_TOKENNAME=apiKey
AUTH_SERVER_KEYCLOAK_HOST={keycloak-host-url}
AUTH_SERVER_KEYCLOAK_REALM=myrealm
AUTH_SERVER_CLIENTID={song-client-ID}
AUTH_SERVER_CLIENTSECRET={song-client-secret}

# Scope Configuration
AUTH_SERVER_SCOPE_STUDY_PREFIX=PROGRAM.study123
AUTH_SERVER_SCOPE_STUDY_SUFFIX=.WRITE
AUTH_SERVER_SCOPE_SYSTEM=song.WRITE

# Authentication Endpoints
AUTH_SERVER_INTROSPECTIONURI={keycloak-host-url}/realms/{keycloak-realm}/apikey/check_api_key/
SPRING_SECURITY_OAUTH2_RESOURCESERVER_JWT_PUBLIC_KEY_LOCATION={keycloak-host-url}/realms/{keycloak-realm}/protocol/openid-connect/certs
Replace any default values with the values specific to your environment. The variables are explained in detail below:
Click here for details
Server Authentication Integration
AUTH_SERVER_PROVIDER: Required - Specify the authentication server provider. In this case, it's set tokeycloakAUTH_SERVER_KEYCLOAK_HOST: Required - The host address for the Keycloak server. Default ishttp://localhostupdate this variable accordinglyAUTH_SERVER_KEYCLOAK_REALM: Required - The realm in Keycloak under which the Song service is registered. Example:myrealmAUTH_SERVER_INTROSPECTIONURI: Required - URL for the Keycloak API endpoint that validates a user's API key. Specify the full endpoint URL by inserting your realm nameAUTH_SERVER_TOKENNAME: Required - Name identifying a token. Keep this as the default valueapiKeyAUTH_SERVER_CLIENTID: Required - The client ID for the Song application configured in KeycloakAUTH_SERVER_CLIENTSECRET: Required - The client secret for the Song application configured in Keycloak. This can be accessed from the "Client details" under the "Credentials tab"
Scope Configuration
AUTH_SERVER_SCOPE_STUDY_PREFIX: Required - Prefix applied before the Song study name when assigning study-level scopes. Default:STUDY.AUTH_SERVER_SCOPE_STUDY_SUFFIX: Required - Suffix applied after the Song study name when assigning study-level scopes. Default:.WRITEAUTH_SERVER_SCOPE_SYSTEM: Required - Scope (permission) for system-level access to Song using an API key. Default:song.WRITE
JWT Configuration
SPRING_SECURITY_OAUTH2_RESOURCESERVER_JWT_JWKSETURI: Required - URI for JWT JSON Web Key Set (JWK Set) for the OAuth2 resource server. Specify the Keycloak server URI by inserting your realm name
If you encounter any issues or have questions about our API, please don't hesitate to reach out through our support page or our discussion forum.